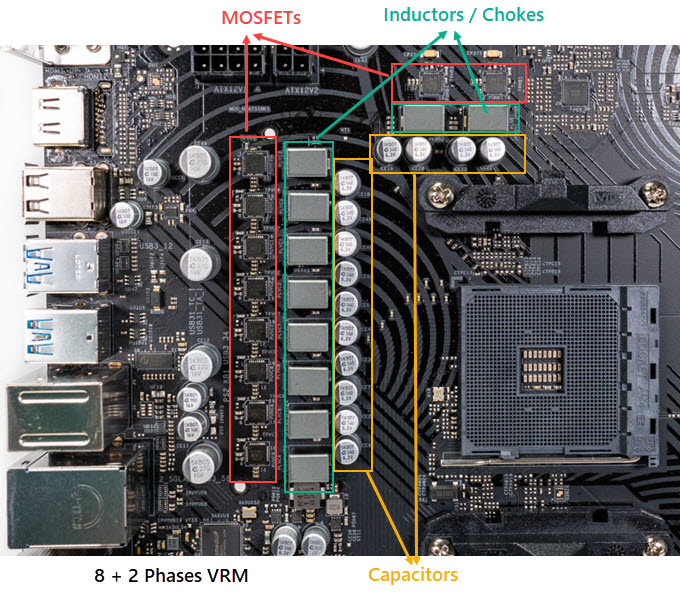
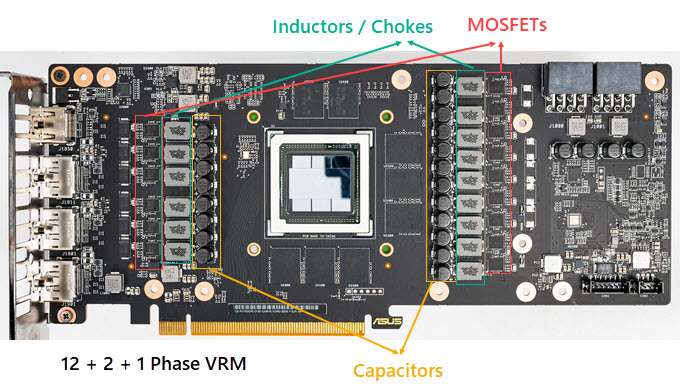
The voltage regulator module (VRM) is one of the most important circuits in a motherboard and graphics card. The main components of VRM include MOSFETs (Metal Oxide Silicon Field Effect Transistors), Inductors/Chokes, Capacitors, and PWM or Driver IC. The main job of the VRM is to supply correct and stable voltage to the CPU/GPU and Memory (RAM/VRAM) for their operation. In most cases, VRMs on motherboards and graphics cards have VRM configuration in the form of X+ Y, where X and Y are numbers and represent the number of phases of the VRM circuitry. Each phase can be seen as a single VRM unit, and all units run in parallel to form the complete VRM circuit. Here, X represents the number of phases for CPU/GPU, and Y represents the number of phases for Memory/Video Memory (VRAM). For example, if a motherboard VRM has 6+2 Phases, then 6 phases deliver voltage to the CPU, and 2 phases supply voltage to the memory or RAM. You should note that the voltage for CPU and Memory are different. Also, the voltage for each CPU/GPU and Memory Type is different. Modern-day high-end motherboards and graphics cards can have VRM configuration in the form of X+Y+Z (X, Y, and Z are phases) depending on the motherboard’s or graphics card’s design.
Motherboard VRM
Graphics Card VRM
VRM components get hot due to continuous operations and may require cooling, especially during overclocking. The one component that can get very hot in VRM is the MOSFET. Most modern-day motherboards come with a heatsink installed over the MOSFETs in the VRM circuit. On mid-range and higher graphics cards, cooling is provided for both chokes/inductors and MOSFETs using the graphics card main heatsink or through a separate smaller heatsink dedicated to the VRM. Some entry-level or budget motherboards and graphics cards do not have any cooling (heatsink) for VRM, and the VRM components can get very hot when using a high-end processor or overclocking. This may result in reduced performance and instability.
Safe and Optimum VRM Operating Temperature
Generally, the maximum operating temperature of the VRM components, including MOSFETs, Inductors/Chokes, and Capacitors are rated for 100 degrees Celsius and higher (up to 125 °C depending on the MOSFET type), but it is advisable to keep their temperature under 90 °C or 100 °C for optimum performance and to prolong their lifespan.
How to Monitor VRM Temperature [Motherboard and Graphics Card]
Most mainstream and higher motherboards and graphics cards have a VRM temperature sensor that allows you to monitor the VRM temperature using hardware monitoring or system information software. If your motherboard does not come with a VRM temperature sensor, there are some ways to monitor its VRM temperature. Below is a comprehensive guide on monitoring the VRM temperature of any motherboard.
Check out: Top Ways to Check Motherboard VRM Temperature
Note: When we talk about VRM temperature, we generally mean the temperature of the MOSFETs. The VRM temperature sensor on the motherboard and graphics card shows the MOSFETs’ temperature only.
Motherboard VRM Overheating Solutions
Below are some measures you can employ to reduce Motherboard’s VRM temperature.
Thermal Pad Replacement
If your motherboard VRM comes with a heatsink and you are not satisfied with the VRM temperature, you can replace the stock thermal pads with high-quality thermal pads from reputed brands like Arctic, Thermal Grizzly, etc. These branded thermal pads offer higher thermal conductivity and allow better heat transfer from the source (MOSFET, IC, etc.) to the heatsink.
Replacing the motherboard’s VRM heatsink is relatively easy as you only have to unplug the spring-loaded retainer clips or screws located on the sides of the heatsink, and the heatsink will come off. After removing the VRM heatsink, you can see thermal pads or MOSFETs on the heatsink. To replace the thermal pads with new ones, remove the existing ones, clean the heatsink and MOSFETs with 99% Isopropyl alcohol, and then put the thermal pads onto the MOSFETs. After that, install the heatsink and make sure that the retainer clips/screws have clicked in or tightened fully at their location.
Checkout: Best Thermal Pads for CPU, GPU, VRAM and VRM
Installing Heatsinks on VRM
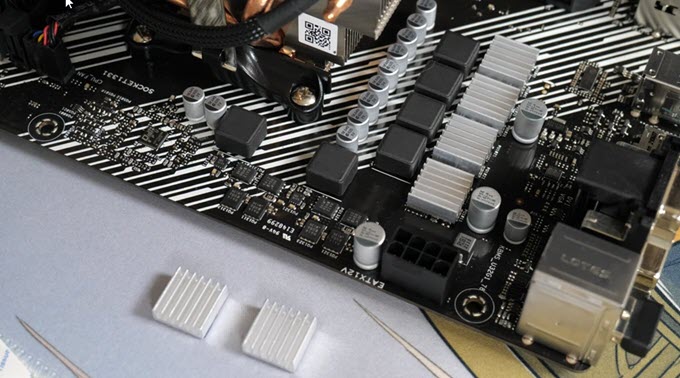
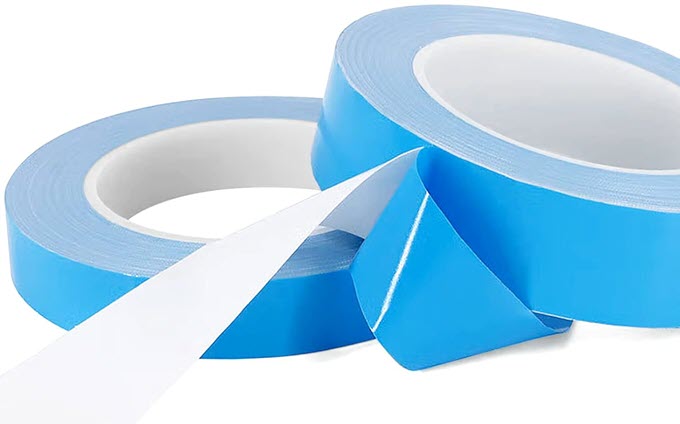
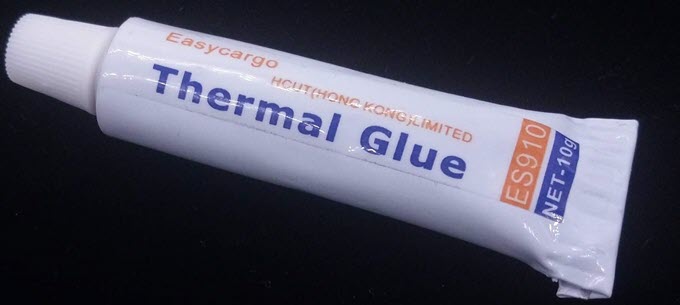
If you have a budget, entry-level, or cheap motherboard without VRM heatsinks, then you can install them by yourself on the VRM MOSFETs to keep them cool. You can get small mini aluminum heatsinks available on Amazon or use M.2 heatsinks and fix them on the VRM MOSFETs using a Thermal Adhesive Tape or Thermal Glue / Thermal Plaster.
Thermal Adhesive Tape [Double Sided]
Thermal Glue / Heatsink Plaster
Buy Thermal Glue / Heatsink Plaster
Increasing Airflow or Blowing Air on VRM
Directly blowing air over the VRM circuit or VRM heatsink can reduce the VRM temperature significantly. The problem is how to fix a smaller 40mm or 60mm fan on the VRM heatsink or inside the PC Case so that it can directly blow air over the VRM circuits. On some motherboards, you may tie the fan on the VRM heatsink using a zip tie or use screws to fix the fan on the VRM heatsink fins. The issue with these two approaches is that they do not apply to all VRM heatsinks and are not a permanent solution. The permanent and sturdy way is to use a VRM cooling fan adapter bracket. SilverStone offers a VRM fan bracket (FDP01 VRM Fan Bracket) that can be fixed or mounted on the chassis rear 120mm or 140mm fan. On this bracket, you can install one 80mm fan or two 60mm fans to blow air directly over the VRM.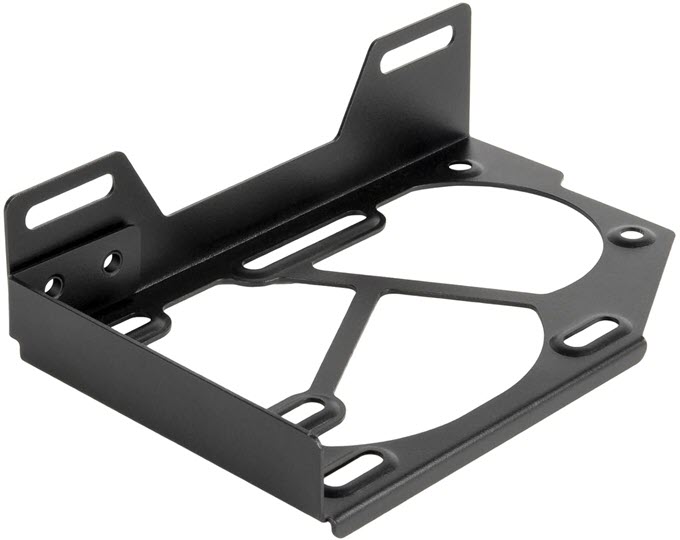 SilverStone FDP01 VRM Fan Bracket is made of steel and is very sturdy. It weighs only 87 gm and has dimensions 92mm (W) x 35mm (H) x 142mm (D). The bracket is available in black color only. The VRM fan bracket may not be compatible with all CPU Air Coolers because the CPU heatsink can interfere with the VRM fan bracket. Assuming a fan has a standard thickness of 25mm, installing the fan on the bottom of the bracket is recommended if the CPU cooler height is about 55mm. If the CPU cooler height is 75mm, installing the fan on the top of the bracket is recommended. Since the fan’s position behind the case is relative to the motherboard, which is not a fixed value, this is only a suggestion and does not guarantee compatibility. However, if you have AIO Liquid CPU Cooler, then the VRM fan bracket will have almost no issues when it comes to compatibility.
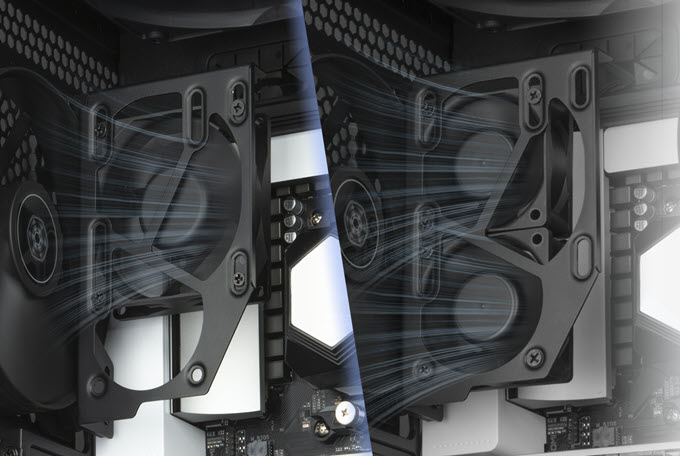
The model number of this VRM fan bracket from SilverStone is SST-FDP01B, which you can buy from the link below.
Buy SilverStone VRM Cooling Fan Adapter Bracket FDP01
For 80mm and 60mm fans, I would recommend the following fans:
80mm Fans – Noctua NF-A8 FLX, Premium Quiet Fan 3-Pin, Noctua NF-A8 PWM, Premium Quiet Fan 4-Pin
60mm Fans – Noctua NF-A6x25 FLX, Premium Quiet Fan 3-Pin, Noctua NF-A6x15 FLX, Premium Quiet Slim Fan 3-Pin (Slim 15mm Thick Fan), Noctua NF-A6x25 PWM, Premium Quiet Fan 4-Pin, Noctua NF-A6x15 PWM, Premium Quiet Slim Fan 4-Pin
Graphics Card VRM Overheating Solutions
Below are some things you can do to reduce Graphics Card’s VRM temperature.
Replace Thermal Pads
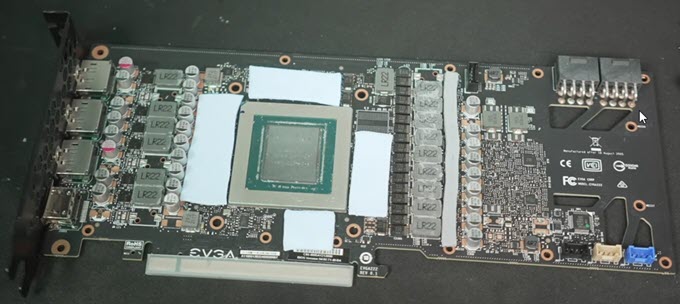
Replacing VRM thermal pads can help reduce the VRM temperature, especially if the VRM thermal pads are of inferior quality or do not make proper contact with the GPU cooler heatsink. To replace the VRM thermal pads, you have to take out the entire graphics card cooler, including the fans and heatsink. After that, you have to remove the old thermal pads, clean the VRM, and then put the right size thickness new thermal pads on the VRM MOSFETs. Below are some of the best thermal pads you can buy for VRM, VRAM, or any other IC or Chipset.
Increase Airflow over Graphics Card
You can increase the overall airflow on the graphics card, which can help reduce the temperature of its components, including the VRM. To do this, you can use the following graphics card accessories or devices.
PCI Slot Fan Cooler and Backplate Cooler
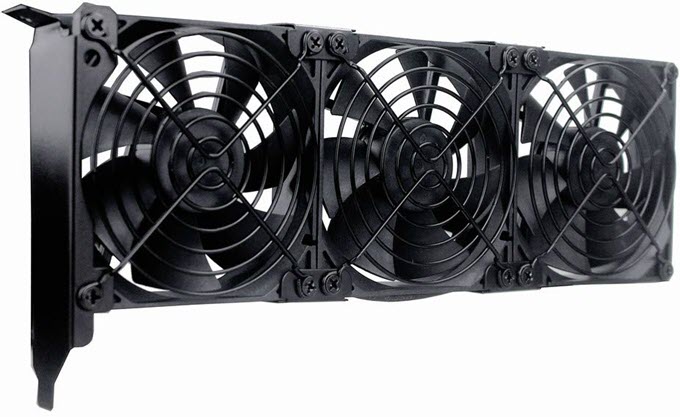
You can increase the airflow on the front end of the graphics card using a PCI Slot Fan Cooler. It is a simple device that consists of a PCI bracket with a fan mounting frame and chassis fans that can be mounted on the frame. These fans blow air directly on the shroud of the graphics card. PCI Slot Fan Cooler can significantly lower your overall graphics card temperature in most cases. PCI Slot Fan Cooler works for all graphics cards and can be installed in almost all ATX PC Cases with seven expansion slots.
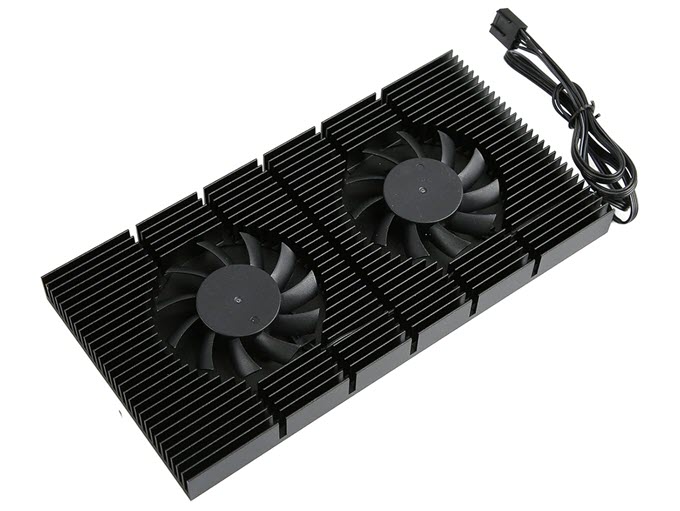
A Backplate Cooler is a slim heatsink and fan assembly that you can attach to the graphics card backplate to reduce the backplate temperature. On some graphics cards, especially high-end ones, the backplate gets very hot because it is used to cool some VRAM modules and VRM components attached to the backplate using thermal pads.
Check out: Best PCI Slot Fan Coolers and Backplate Coolers for Graphics Cards
SilverStone FDP02 External GPU Cooling Fan Adapter Bracket
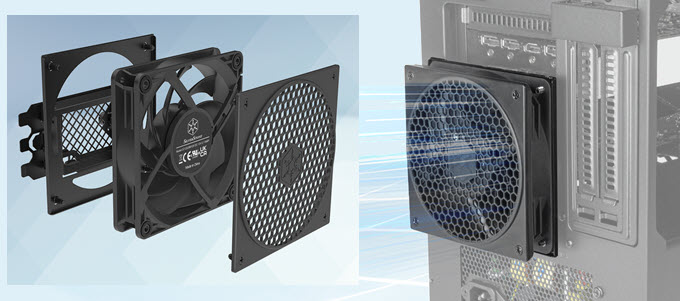
Another way to increase airflow around the graphics card is by using the SilverStone FDP02 External GPU Cooling Fan Adapter Bracket. The PCI bracket mounts onto the PC Chassis’ rear PCI slots and a 120mm fan can be mounted outside the chassis. The fan is mounted in an exhaust configuration to move the hot air away from inside the PC Case to outside surroundings. A 120mm fan with fan grill (for protection) comes bundled with the SilverStone FDP02 External GPU Cooling Fan Adapter Bracket.
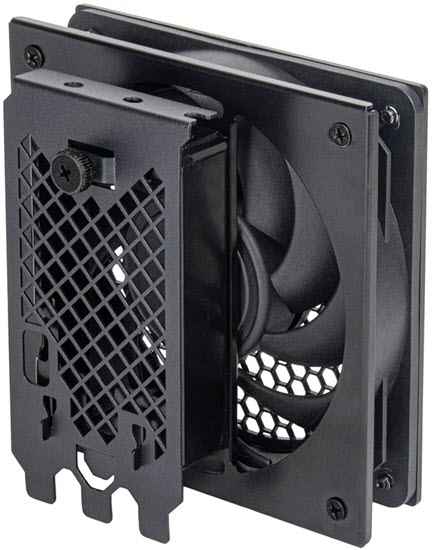
The fan has a maximum speed of 1500 RPM and comes with a Hydraulic Bearing and a 3-pin connector. The fan acts as a second exhaust fan, and it sits near the graphics card, helping the graphics card airflow and removing hot air generated inside the PC case, mainly by the graphics card and CPU. This GPU cooling fan bracket is compatible with tower PC Cases with seven expansion slots and a power shroud or PC Cases with eight expansion slots. The bracket is available in two colors, black and white. The complete model number of this SilverStone GPU cooling fan bracket is SST-FDP02B.
Buy SilverStone FDP02 External GPU Cooling Fan Adapter Bracket
Need more help?
If you have any questions regarding motherboard or graphics card VRM overheating, please post them in the comment section below.
(*This post may contain affiliate links, which means I may receive a small commission if you choose to purchase through the links I provide (at no extra cost to you). Thank you for supporting the work I put into this site!)
![How to Increase FPS or Frame Rate in Games [Top Tips] How to Increase FPS or Frame Rate in Games [Top Tips]](https://graphicscardhub.com/wp-content/uploads/2016/11/increase-game-fps-211x150.jpg)
![Fix Computer won’t Shut down in Windows [PC or Laptop] Fix Computer won’t Shut down in Windows [PC or Laptop]](https://graphicscardhub.com/wp-content/uploads/2022/06/computer-wont-shut-down-211x150.jpg)