‘Cache Hierarchy Error’ is one of the most annoying problems you can face with your CPU or processor. The problem generally occurs with AMD Ryzen Processors, especially in the Ryzen 5000 series and higher, including Ryzen 7000 and Ryzen 9000 series. The error can occur at any time, whether your PC is idle (or low load) or you are gaming or working. This error can cause your computer to restart randomly, display a Blue Screen of Death (BSOD), or freeze, depending on the specific cause. ‘CPU Cache Hierarchy Error’ can be caused by several factors, and there is no single solution to address this issue. So, here I am going to list the major causes of ‘CPU Cache Hierarchy Error’ along with relevant solutions to fix the problem.
‘Cache Hierarchy Error’ Description
The following message will be shown when you check the error in the Windows Event Viewer.
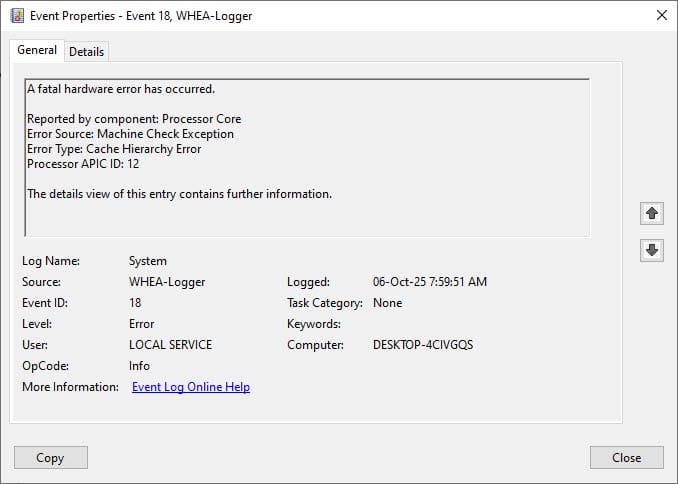
Event Properties – Event 18, WHEA – Logger
A fatal hardware error has occurred.
Reported by component: Processor Core
Error Source: Machine Check Exception
Error Type: Cache Hierarchy Error
Processor APIC ID: 12
The details view of this entry contains further information.
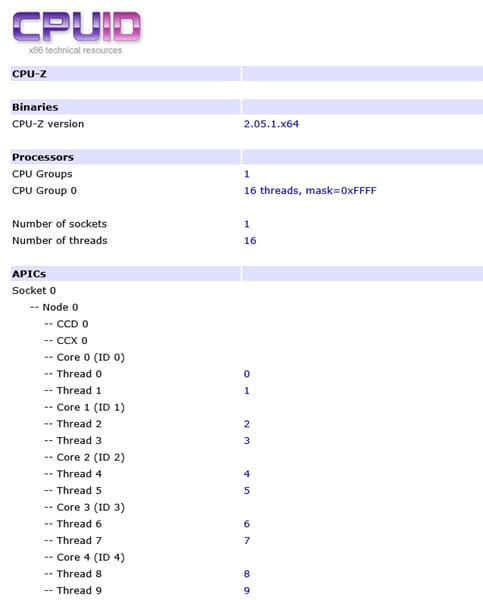
Note: The APIC ID may differ for different users or each time an error is encountered. It is usually assigned to one of the Processor Cores. You can use the free utility CPU-Z to determine the Physical Core of your Processor associated with the APIC ID. Launch CPU-Z, expand the Tools menu at the bottom of the tool, select Save Report as .HTML/.TXT, and click it. Save the file on your drive, then open it to check which Processor Core is associated with which APIC ID.
WHEA stands for Windows Hardware Error Architecture (WHEA), a collection of Windows components that provide support for hardware error reporting and recovery.
Cache Hierarchy Error Causes and Solutions
Below are the major causes of the ‘CPU Cache Hierarchy Error’ along with relevant solutions.
Windows Corruption
One of the most common causes of ‘CPU Cache Hierarchy Error’ is the missing or corruption of critical Windows System Files. To check whether your Windows system files are missing or corrupted, run the System File Checker by typing the sfc /scannow command in the command prompt (with administrator privileges).
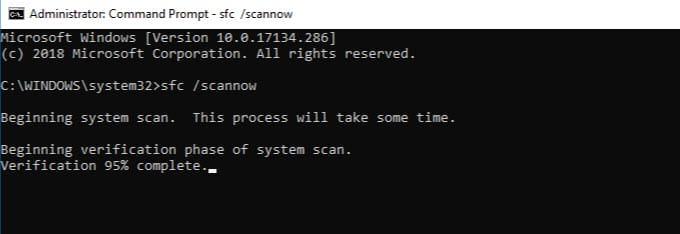
If System File Checker found and fixed the errors, then the ‘CPU Cache Hierarchy Error’ is most likely fixed. However, if the System File Checker found corruption and was unable to fix it, you have to repair the System File Checker by launching the Deployment Image Servicing and Management (DISM) tool. To run DISM, right-click Command Prompt and then select Run as administrator. Now, type the following command:
DISM.exe /Online /Cleanup-image /Restorehealth
If Windows system file corruption cannot be repaired by the System File Checker tool, you have to perform a clean installation of Windows. If System File Checker did not find any system file errors, then the ‘Cache Hierarchy Error’ is caused by the other issues listed below.
CPU Overheating
Overheating of the CPU may also cause ‘Cache Hierarchy Error’. So, monitor your CPU temperatures and check whether it is overheating or running within a safe temperature range. If your CPU is overheating, you need to take appropriate measures, such as replacing thermal paste, increasing case airflow, or upgrading the CPU cooler, to reduce its temperature. However, if your CPU is not overheating and you are still getting the ‘Cache Hierarchy Error,’ then look for other causes.
Overclocking
CPU or Memory Overclocking, whether manual or auto overclocking, may cause ‘CPU Cache Hierarchy Error’. If you manually overclock the processor or memory and it is unstable, you will experience restarts and BSODs. CPU auto-overclocking via the BIOS or AMD Ryzen Master software may also cause a Cache Hierarchy Error. So, please turn off the overclocking (manual or auto), and monitor the PC by leaving it idle for a while and playing some games. In some cases, GPU overclocking can also cause a Cache Hierarchy Error, so make sure to remove the overclock from the GPU as well. If the ‘Cache Hierarchy Error’ returns, then there are other issues causing the error that you have to look for.
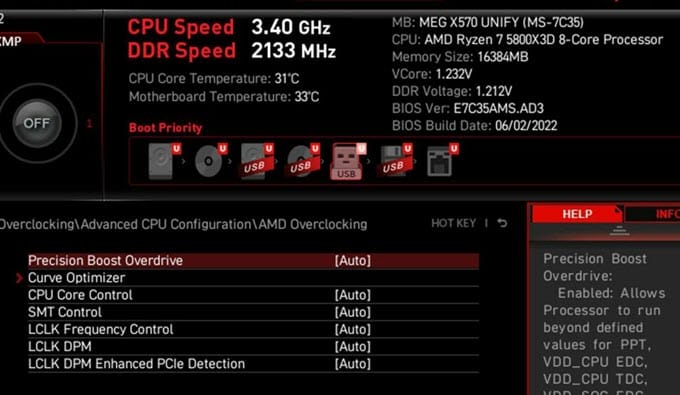
Precision Boost Overdrive (PBO) – Turning off or disabling the Precision Boost Overdrive (PBO) in the BIOS may help to fix the ‘Cache Hierarchy Error’.
Memory / RAM Issues
Memory (RAM) can also cause a CPU ‘Cache Hierarchy Error’. Some memory-related issues that can result in this error are listed below.
RAM Incompatibility – Memory (RAM) incompatibility can also lead to a ‘Cache Hierarchy Error’. If you recently upgraded your memory modules or added a different one and started getting this error after the upgrade, it is most likely the RAM causing the issue. For this, you have to check your motherboard manufacturer’s manual to find out which memory brand is compatible with your AMD based system.
XMP or DOCP Issues – Enabling or disabling XMP or DOCP for your RAM in your motherboard BIOS can also cause a Cache Hierarchy Error. To test this, you can try turning the XMP profile on or off on your RAM, then monitor the system to see if the error returns. If disabling or enabling XMP has any effect and you are still getting the Cache Hierarchy Error, then something else is causing it.
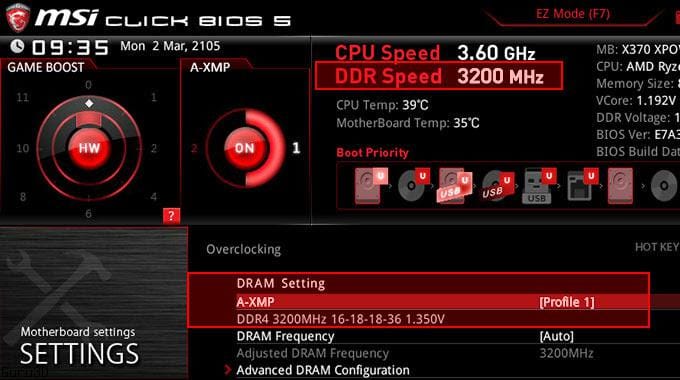
Infinity Fabric Clock (FCLK) – On modern-day Ryzen systems, the frequency of Infinity Fabric plays a crucial role in your system’s performance and stability. The Ryzen Infinity Fabric Clock (FCLK) should ideally run at a 1:1 ratio with the memory clock, or at least be a simple ratio like 1:2. For example, with 3600MHz RAM, the Infinity Fabric should be at 1800MHz. So, if you have faster RAM like DDR4 4000MHz and your Infinity Fabric clock is running at 1900 MHz or higher, then you may encounter ‘Cache Hierarchy Error’. In this example, manually setting the FCLK (Infinity Fabric Clock) to 1700 MHz in the BIOS can fix the issue. So, check your Infinity Fabric Clock (FCLK) frequency; if it is running at the ideal speed, then other problems are causing the Cache Hierarchy Error.
Note: Infinity Fabric Clock (FCLK) governs the frequency of the Infinity Fabric, which links the compute dies, I/O die, and other components.
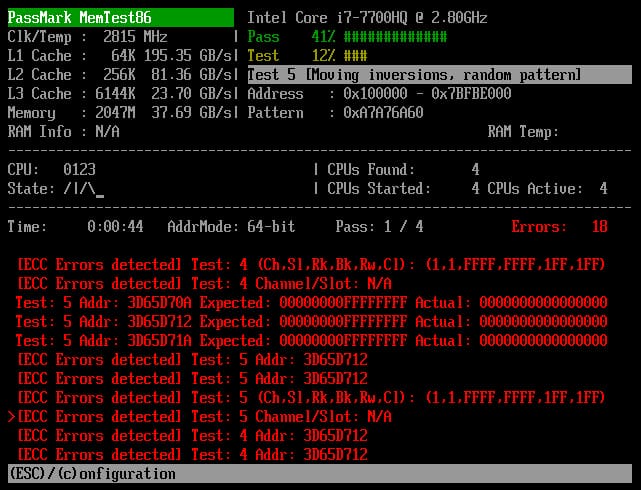
Faulty RAM – A defective RAM module can also cause ‘Cache Hierarchy Error’. So, make sure your memory does not have errors. You can use Memtest86+ to check your RAM for errors.
BIOS Issues and Settings
The following BIOS-related issues and settings may cause ‘Cache Hierarchy Error’.
BIOS Settings – Sometimes, knowingly or unknowingly, your BIOS settings can get messed up or stop working. Here, the solution is to reset the BIOS settings using the BIOS reset button, or to clear the CMOS by removing the CMOS CR2032 Coin Cell or Battery from the motherboard for 1 minute.
BIOS Compatibility – Your motherboard’s BIOS may be very old and not fully compatible with your current hardware, especially the CPU. So, it is better to update the BIOS to the latest stable version. Avoid the beta version of the BIOS, even if it is the latest, because it can do more harm than good and may introduce new issues.
Global C-state setting – Disabling the Global C-state setting in the BIOS can fix the ‘Cache Hierarchy Error’ for many users.
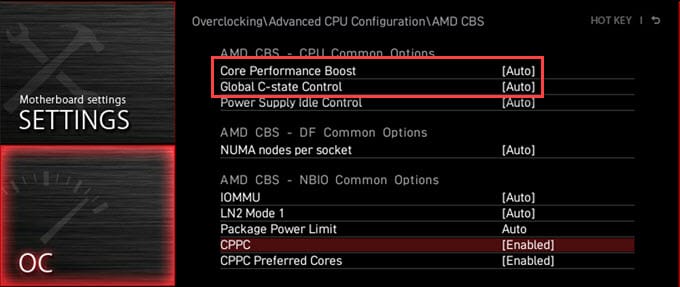
Core Performance Boost setting – Disabling the Cache Core Performance Boost in the BIOS may fix the CPU Hierarchy Error for some users.
CPU Voltage Issues
The following CPU Voltage issues can also result in ‘Cache Hierarchy Error’.
Undervolting – If you have undervolted your AMD Ryzen processor, then ‘Cache Hierarchy Error’ may appear for some users. Ryzen CPUs are very voltage-sensitive, and even minor voltage fluctuations, especially at lower voltages, can cause instability. So, turn off undervolting if you are facing the issue.
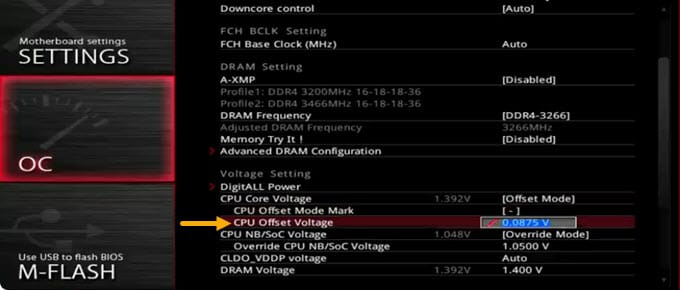
CPU Voltage on Auto Mode – With some motherboards, auto-voltage mode in the BIOS may not work well with Ryzen CPUs, which can cause a ‘Cache Hierarchy Error’. Generally, a slightly lower voltage setting in the motherboard’s BIOS can cause this issue. To solve this, you can either set the CPU Voltage (Vcore) manually or add a positive offset to it. For most users, setting a slightly higher CPU Voltage (Vcore) manually or using an offset can fix the ‘Cache Hierarchy Error’. For example, if your CPU Voltage is set to 1.0 V in Auto mode, you can manually increase it slightly (+0.1V) to 1.1V or add a positive offset to the CPU voltage. Advanced users can also use AMD Curve Optimizer to set negative or positive offsets for all cores or per core, and check the CPU’s stability for potential errors.
AMD Chipset Drivers
Sometimes, an AMD chipset driver may cause the ‘Cache Hierarchy Error’. So, it is recommended to update the AMD Chipset Drivers to the latest version.
GPU Related Issue
For some users, the AMD Radeon RX 5000 / RX 6000 / RX 7000 series GPU caused the ‘Cache Hierarchy Error,’ and switching to an older Radeon RX 580 or an Nvidia GPU fixed their problem. Moreover, it is recommended that you update your GPU drivers to the latest stable version to avoid issues.
Windows 10/11 Update
A bad batch of Windows 10/11 Update can also cause ‘Cache Hierarchy Error’. So, if you get ‘Cache Hierarchy Error’ after updating to Windows, then you must rollback to the previous update to fix the issue.
Software or Application Conflict
A third-party software or application conflict can also lead to ‘Cache Hierarchy Error’. If you get this error after installing a software or application, the issue is due to the third-party software/application. Here, you can either uninstall the software or install another version.
Faulty Power Supply
A faulty power supply unit (PSU) can also cause ‘Cache Hierarchy Error’. If the power delivery to your processor is not proper due to a faulty PSU, you will get the ‘CPU Cache Hierarchy Error’. The solution here is to get a new PSU for your PC.
Faulty Processor
A faulty processor can also cause ‘Cache Hierarchy Error’. It is pretty rare for a processor to go bad, but it can happen. Some users have resolved the ‘Cache Hierarchy Error’ by replacing their processor. If your processor is under warranty, you can RMA it to get a new one if none of the fixes mentioned here work for you.
Some other things you can try
Here are some other things you may try if the above fixes did not resolve the ‘Cache Hierarchy Error’.
- Disable fast startup
- Changing the power plan settings to Balanced or High performance
- Remove PSU extension cables for the Graphics Card
- Tweaking CPU load line calibration (LLC) mode in BIOS
- Installing the AMD PRO drivers instead of the Adrenalin ones for the AMD GPU
- Newly installed hardware may be causing the issue, e.g., SSD
Need More Help?
If you still have any queries regarding the CPU Cache Hierarchy Error, or none of the above solutions resolve the issue for you, please let me know in the comments below.
(*This post may contain affiliate links, which means I may receive a small commission if you choose to purchase through the links I provide (at no extra cost to you). Thank you for supporting the work I put into this site!)


![What Graphics Card do I have? [Windows, Mac OS, Linux]](https://graphicscardhub.com/wp-content/uploads/2018/11/what-graphics-card-do-i-have-211x150.jpg "What Graphics Card do I have? [Windows, Mac OS, Linux]")