If your motherboard chipset and VRM get very hot, then they can lead to instability and other issues with your PC. VRM or Voltage Regulator Module is responsible for providing power to your processor or CPU and RAM. It converts higher 12V or 5V voltages from the PSU to a much lower voltage (1.2V or so) that is required by the CPU or processor. VRM mainly consists of MOSFETs, Inductors or Chokes, Capacitors, and a Logic Unit which is an Integrated Circuit (IC) and is called the PWM controller. MOSFETs are the main element of a VRM, and they can get very hot during high CPU usage, especially during overclocking. Almost all of the mid-range and high-end motherboards come with heatsinks over VRMs for overclocking, so as to prevent them from overheating and thus avoiding any kind of system instability and unexpected shutdown.
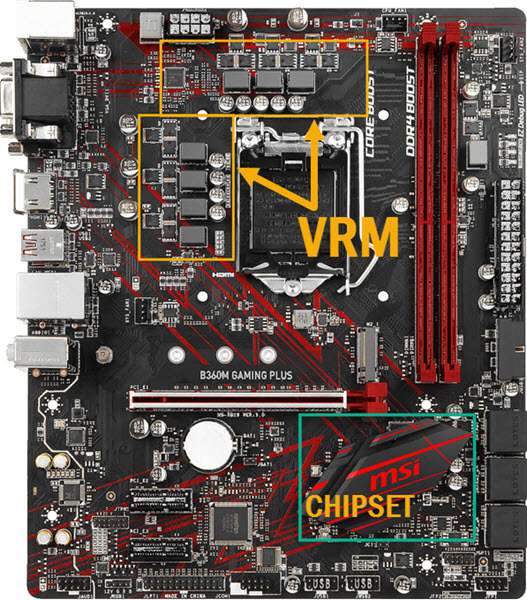
Modern-day motherboard chipsets consist of I/O channels and Interfaces that include SATA ports, USB ports, RAID support, some PCI-E lanes, and maybe some other things depending on the chipset. Basically, a motherboard chipset allows I/O devices and components to communicate with the CPU. Intel calls its motherboard chipset PCH (Platform Controller Hub), whereas AMD calls it FCH (Fusion Controller Hub) or just motherboard chipset only.
A low-end motherboard chipset may not get that hot, but a mid-range and high-end motherboard chipset can get very hot and they are generally equipped with bigger heatsinks. Motherboard chipsets generally remain within the safe temperature range, but if they cross the threshold temperature then you can face various issues regarding stability.
Monitoring and knowing about your VRM and Motherboard temperature is very important, when you are facing any kind of instability issues with your system because these components often get ignored most of the time. So, here I am going to list down various methods to find out your motherboard chipset and VRM temperature, so that can you can take appropriate measures to cool them down.
How to Check VRM & Chipset Temperature
Here are the various methods and techniques by which you can monitor your motherboard’s chipset and VRM temperature. Most of these methods can also be used to measure graphics card VRM temperature, and the temperature of its, GPU & VRAM.
HWiNFO
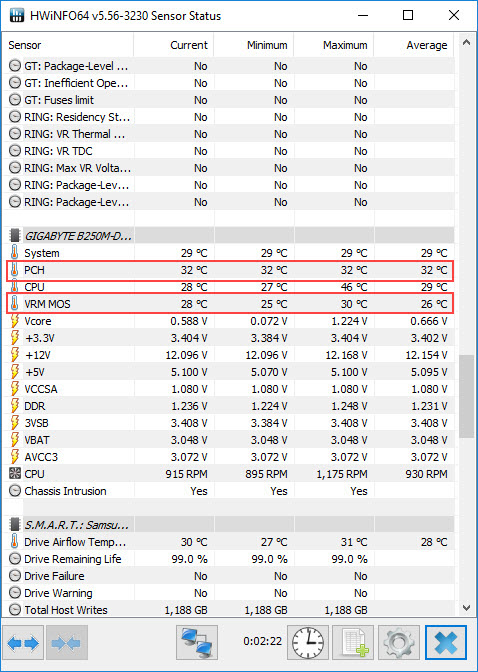
The easiest way to find out VRM and chipset temperature is by using HWiNFO, which is a very good hardware information and monitoring tool or utility. It should be noted that this method only works if your motherboard has built-in sensors for VRM and Chipset temperature monitoring. To know about the temperature of your motherboard chipset and VRM, launch the HWiNFO program, and from the Menu bar, go to Monitoring->Sensor status. A window will open, and here, scroll down to your motherboard section. For example, the motherboard listed here is Gigabyte B250-D2V-CF. Below that, you will find temperature readings for System, PCH, CPU, and VRM MOS. PCH is your motherboard chipset and VRM MOS is the temperature of the MOSFETs of VRM, which are the main components of VRM. You can download the HWiNFO for free from the link given below.
Related: Best Free Hardware Monitoring & Information Utilities
Infrared Thermometer
The second easiest way to find out the VRM and Chipset temperature is by using an Infrared Thermometer or Infrared Temperature Gun. It is a small device that lets you find the temperature of any object without touching it. Just hold it in your hand and direct it towards the object of which you want to find out the temperature, and then within a fraction of a second, the temperature reading gets displayed on the LCD screen of the device. The device also comes with a built-in laser at its front end that lets you target and focus on smaller objects or at a particular point for better accuracy. So, if you want to find out about the temperature of your VRM or chipset, then open your computer case and point the laser of the temperature gun over the MOSFET / Chipset, or its heatsink to find out its temperature.
It must be noted that this device gives only the surface temperature of the object, so if your VRM or Chipset has a heatsink over it then it will give you the temperature of the heatsink, which will be a few degrees lower than the actual temperature of the component. An infrared thermometer is also very helpful to crosscheck the temperatures of the VRM and Chipset, even when the motherboard has sensors for them. This is because sometimes a bad sensor can report much lower or higher temperatures. So, it is a good practice to verify the temperatures with an infrared thermometer, even when everything is alright or when you have some doubts regarding their temperature. You can also find out your CPU heatsink temperature, graphics card VRM temperature, RAM temperature, or temperature of other things using the infrared thermometer. These Infrared Thermometers can be found pretty cheap, and here are some affordable Infrared Thermometers that you can use for finding the temperature of any object including electronic components:
Etekcity Lasergrip 774 Infrared Thermometer
A cheap infrared thermometer that can be used to measure the temperature of any object including electronics and internal components of your computer. It can measure temperature in the range of -58°F to 716°F / -50°C to +380°C with ±2% or 2°C. However, it has got fixed emissivity (0.95), which means you will have a hard time getting an accurate temperature reading from shiny surfaces or shiny metals that are bad at emitting their own infrared radiation, as they mostly emit ambient infrared radiation. But for the electronics, it will serve your purpose pretty well and can provide results with acceptable accuracy.
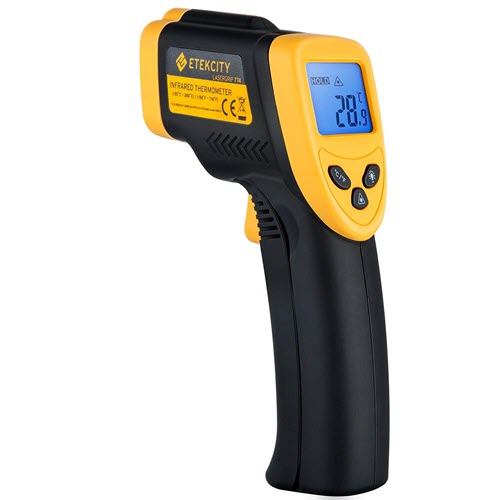
This IR Thermometer has a 12:1 distance spot ratio and can measure the temperature of distant objects with pretty good accuracy. It comes with a backlit LCD screen, and for power, it requires a 9 Volt battery. The temperature response time is under 500ms, which is quite fast, and it can operate in the temperature range from 0°C to 50°C. The construction quality of the thermometer is good and it has got UV paint coating to resist scratches and wear. There is another model available Etekcity Lasergrip 1080 at a couple of dollars more that has a higher temperature recording range of -58°F to 1022°F / -50°C to +550°C, while other features remain the same. You can check it out too from the links given below.
Note: To get the best accuracy, the distance between the thermometer and the object of measurement should be around 14.17 inches (36cm).
| Etekcity Lasergrip 774 Infrared Thermometer Specifications | |
| Temperature Range | -58°F to 716°F / -50°C to +380°C |
| Accuracy | ±2% or 2°C |
| Emissivity | 0.95(fixed) |
| Laser Guidance | Single Laser |
| Battery | 9 Volt |
| Distance Spot Ratio | 12:1 |
| Features | Backlit LCD Screen, Auto-Off function, Low battery indicator, <500ms Response time |
Buy Etekcity Lasergrip 774 Infrared Thermometer
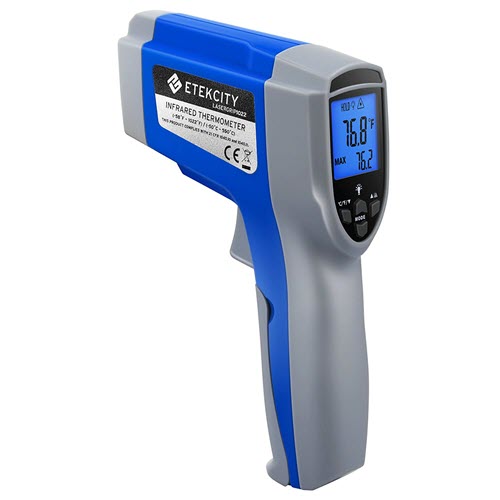
Etekcity Lasergrip 1022 Infrared Thermometer
[Adjustable Emissivity, More Accurate]
This Infrared Thermometer comes with adjustable emissivity (0.1 – 1.0 Adjustable) to provide you with better accuracy in measuring temperatures of shiny metals and other objects. It can measure temperature in the range of -58°F to 1022°F / -50°C to +550°C with an accuracy of ±2% or 2°F/2°C. For guidance and targeting, it comes with a single laser, and for display, it has got a backlit LCD screen. The distance spot ratio for this Infrared temperature gun is 12: 1 for measuring the temperature of far-off objects with pretty good accuracy. The response time is under 500ms for super-fast measurement. It is solidly built and has got UV coating over it for protection. A dual laser variant of this model is also available as Etekcity Lasergrip 1022D for better aiming, and you can check it out too from the links given below.
Note: For best accuracy, the distance between the thermometer and the object of measurement should be kept at approximately 14.17 inches (36cm). I use Fluke IR Thermometer because it is a well-reputed brand and offers great quality and performance, but on the flip side, it costs a little extra.
| Etekcity Lasergrip 1022 Infrared Thermometer Specifications | |
| Temperature Range | -58°F to 1022°F / -50°C to +550°C |
| Accuracy | ±2% or 2°F/2°C |
| Emissivity | 0.1 – 1.0 Adjustable |
| Laser Guidance | Single Laser |
| Battery | 9 Volt |
| Distance Spot Ratio | 12:1 |
| Features | Backlit LCD Screen, Auto-Off function, Low battery indicator, <500ms Response time |
Buy Etekcity Lasergrip 1022 Infrared Thermometer
Buy Etekcity Lasergrip 1022D Infrared Thermometer
Thermal Probe / Temperature Sensor
Another great way to find out about your VRM and Chipset temperature is by using a Thermal Probe or Temperature sensor. These thermal sensors are based on the thermistor and come with a 2-pin connector that can be connected to the motherboard temperature sensor header (if you have any), supported aftermarket fan controller, or standalone digital temperature displays that you can easily find in the market or online.
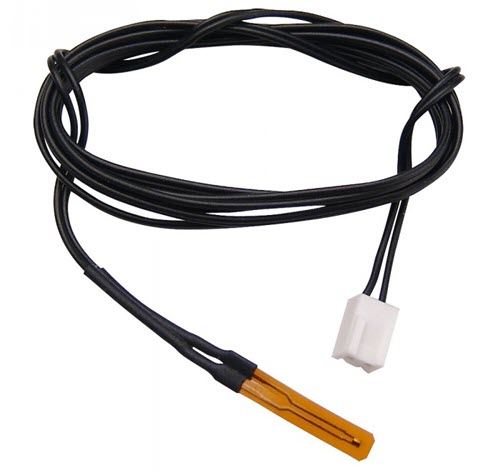
You can attach the thermal probe to the VRM, Chipset, or any other component using thermal tape and then monitor the temperature using the temperature monitoring software such as HWiNFO or on the display of your fan controller or other digital temperature monitoring device with an LCD display. These thermal probes can monitor the temperature to up to 125°C, which I think is sufficient enough. Below are some good thermal probes or temperature sensors that you can get for temperature monitoring of your internal PC components.
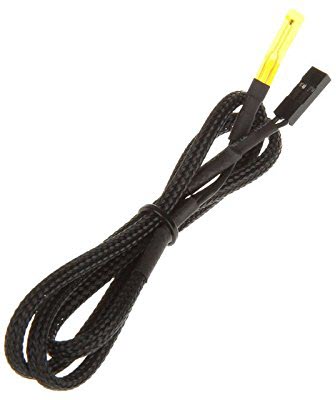
XSPC Wire Sensor 10K
[50cm Sleeved cable, 2-pin]
Phobya 10K Temperature Sensor
[80cm Sleeved cable, 2-pin]
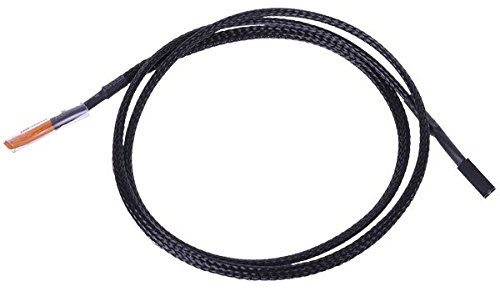
Buy Phobya 10K Temperature Sensor
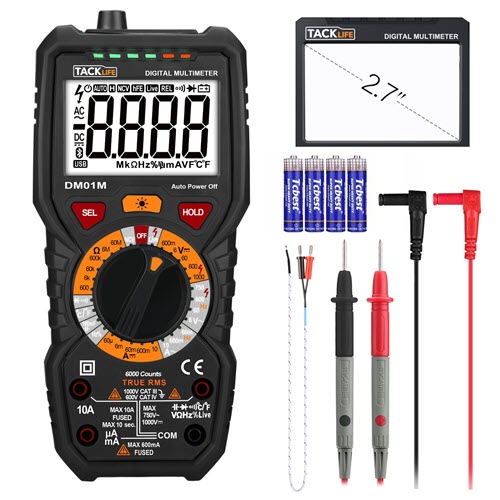
Multimeter
You can also use a multimeter with temperature detection capability to measure the temperature of various objects including VRM and Chipset. This kind of multimeter comes with a thermal probe that you attach to the surface of the component using thermal tape and monitor its temperature. Besides measuring temperature, a multimeter is a very useful device that is used to measure voltage, resistance, current, frequency, and continuity and for checking electronic components like a transistor, diodes, capacitors, etc. It is also the best device for troubleshooting electronic and electrical components or devices. I think it is a must-have device if you are an enthusiast or work with computers and electronics. Here are some good multimeters that you can get for your troubleshooting needs.
AstroAI Digital Multimeter, TRMS 6000 Counts Multimeter
An Affordable Digital Multimeter that measures Voltage, Current, Resistance, Continuity, Capacitance, and Frequency; Tests Diodes, Transistors, Temperature, and more. It comes with a large LCD that is backlit and uses one 9V battery. Ideal for both household and commercial use.
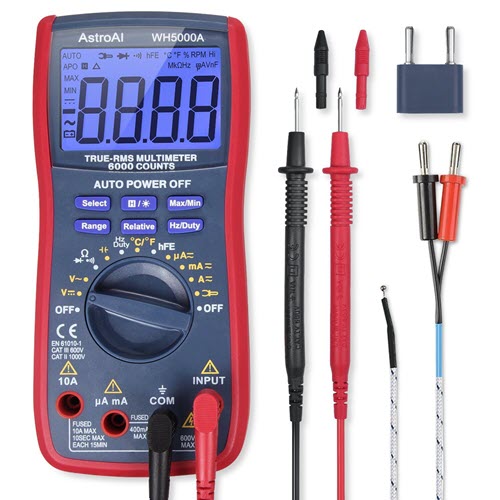
Buy AstroAI Digital Multimeter
Tacklife DM01M Advanced Digital Multimeter TRMS 6000 Counts
Another good budget digital multimeter that can measure temperature, and is great for both household and commercial applications. This multimeter uses four AA batteries for its working.
Buy Tacklife Advanced Digital Multimeter
Infrared Thermal Camera
A thermal camera not only measures temperature, but it can show all the heat zones of the object and its surroundings so that you can get a complete picture of what is going on. Just like Infrared Thermometer, a Thermal camera also uses infrared radiation to know about the temperature of the objects. However, it is a more complex and advanced device compared IR thermometer, and also way more expensive than an IR thermometer. The main advantage of a thermal camera is that it paints a clear picture of the heating object and its surroundings, which allows you to make better and informed decisions to solve the ongoing issue. It has various other applications too e.g. to detect gaps, leaks in buildings or houses, or HVAC checks. It is also known as a thermal imager, an infrared camera, or a thermal imaging camera. Here is a good thermal camera at a reasonable price that you can get for various tasks.
HTI HT-18 Infrared Thermal Camera
A basic handheld infrared thermal camera with a 3.2” display, having a resolution of 220 x 160 pixels. It can detect the temperature in the range of -20°C to 300°C (-4°F to 572°F) with an accuracy of ±2.5°C or ±2.5%. The camera comes with adjustable emissivity (0.1 to 1.0) and has a fixed focus mode. It uses 3.7V Built-in Rechargeable Battery and a USB interface for connectivity. Also, a 3GB SD card comes included with the camera itself. It is pretty lightweight and is one of the most affordable thermal cameras around that also delivers good performance.
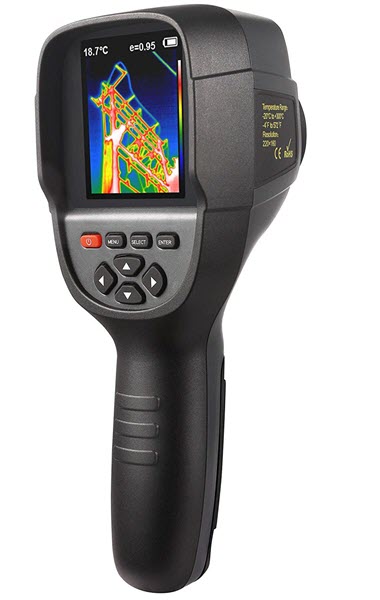
Buy HTI HT-18 Infrared Thermal Camera
How much VRM & Chipset Temperature is Safe?
This is a question that has been asked many times by users, and I think there is no specific answer to it as every motherboard chipset and VRM has its threshold temperature limit. However, in general practice, it is better to keep VRM below 100°C and motherboard chipset or PCH under 70°C to be on the safer side because above these temperatures they lose out on performance and efficiency.
VRM should be under 100°C
Chipset should be under 70°C to 75°C
*Above 100°C, the efficiency and performance of components decrease drastically.
How to Reduce VRM & Motherboard Chipset Temperature
There are a couple of ways to reduce your motherboard VRM and chipset temperature. If your motherboard VRM / Chipset has a heatsink installed over it then it might be possible that the contact between the heatsink and the VRM MOSFET / Chipset is weak, which is causing high temperature. So, to solve this issue you have to install better thermal pads with adequate thickness for proper contact and heat transfer. To maximize cooling, you can also install a small 40mm or 60mm on the heatsink of the chipset, and around the VRM for actively cooling them, thus reducing temperatures to greater levels.
In cases, where your motherboard VRM chipset & VRM does not come with a heatsink installed, then the best way to cool them is by installing an additional small case fan (40mm or 60mm) in your case that blows air over them.
- Best Thermal Pads for VRM & Heatsinks
- Best 60mm & 40mm Fans for PC Cooling
- Best 50mm & 70mm Fans for PC Cooling
See also:
- Fix Motherboard and Graphics Card VRM Overheating
- Fix Graphics Card Overheating [High GPU, VRAM, VRM Temperature]
Final Words
Well, I think I have summed up pretty well how you can check and monitor your motherboard’s Chipset and VRM temperature. It is always better to know about the temperatures of the internal components of your PC so that you can take appropriate actions in time before any mishap happens. I strongly suggest you regularly monitor the temperature of your components once a month or so at moderate to full load, as to make sure that everything is working fine or not. If you have any questions or doubts regarding this topic then you can ask queries by leaving a comment below.
(*This post may contain affiliate links, which means I may receive a small commission if you choose to purchase through the links I provide (at no extra cost to you). Thank you for supporting the work I put into this site!)
![Fix CPU Fan Not Spinning [Top Causes & Solutions]](https://graphicscardhub.com/wp-content/uploads/2020/02/cpu-fan-not-spinning-fix-211x150.png "Fix CPU Fan Not Spinning [Top Causes & Solutions]")
![Fix M.2 SSD not Detected in BIOS or Windows [NVMe or M.2 SATA SSD]](https://graphicscardhub.com/wp-content/uploads/2021/07/Fix-M.2-SSD-not-detected-211x150.jpg "Fix M.2 SSD not Detected in BIOS or Windows [NVMe or M.2 SATA SSD]")

Hi.
My specs:
i5-2300 + 8gb ram 1600 + Asus GTX 660-Ti 2gb oc DirectCUII
FullHD 1080p DELL ST2420L
Windows 10 LTSC
in Company Of Heroes 2 and Men of war Assault 2 Squad ( GPU Usage in these games between 30 to 60 and very bad fps an lag) why????????
CPU usage 45-65
But in Snowrunner and graphic setting High (FXAA – AA – texture Filter off) GPU load between 97 to 99% and fps 31 – 50 and Far Cry 4 Ultra Setting 99% GPU load
Help Me.
Is the V-Sync disabled in these games?
Yes : V-Sync disabled in COH2 an Men Of War
Crank up the in-game graphics settings and check again.
It will be better if I install windows 7 latest version
Yes Windows 7 will be much better for your configuration.
My GPU Driver 451.85 latest version installed
I have seen that latest drivers for older cards do not work well and cause performance issues. Try driver version 388.71 and monitor the performance.
COH2 Graphic setting on Ultra (Anti-Aliasing OFF)
Sorry . Is my CPU and graphic card a bottleneck?
Yes they are not fit for running latest games.
In fact, my system is the snowrunner game, which gives the 2019 product a better frame than the company of heroes 2
i am install Driver 388.71 win 10 but Company Of Heroes 2 hang up and I have to restart the computer
Hi, I looked in my PC formotherboard vrm but can’t find it.
for Infrared Thermometer…
Is there a model that can be used for humans, animals, hot metals, plastics, etc.? all in one
You can use the same industrial one.
hi i have a msi x570s edge max wifi with a 4080 and a ryzen 9 5950, now i really odnt struggle with temperatures except for chipset temp, everything else is below 40 even sometimes while playing games, but chipset idle temp gets to around 60 and im not sure how to lower it. should i add more fans or move the gpu to a higher slot so it could pull air away from chipset?
Placing a slim 60mm fan (10mm or 15mm thick) over the chipset heatsink will significantly lower the temperature. You may use thermal tape to keep the fan in place.