One of the major faults or problems that can occur with a graphics card is artifacts. Artifacts mean the appearance of weird patterns, shapes, figures, or pixels on your monitor’s screen. Some artifacts can be more in number while some can be fewer and concentrated in one region of the monitor only. Also, some artifacts can be random and appear intermittently while some can be permanent and appear right from the boot process. Moreover, most of the time artifacts show up only during high GPU load e.g. while gaming or running a GPU-intensive application or program and when the load decreases they may disappear temporarily. Artifacts pop up back again when the graphics card load and temperature increase during gaming or heavy workloads. Artifacts should not be ignored because most of the time it means that something is not right with your graphics card mainly at the hardware level. Artifacts may also appear because of other issues including software. So, to help you out regarding the artifacts issue, here you will find out all the top causes of artifacts and what can you do to fix them.
GPU Artifacts Examples
Below are some examples of GPU artifacts that can occur on your monitor’s display because of a faulty graphics card or some other causes. Artifacts may differ from one another in appearance depending upon the type of issue involved with your graphics card. Some artifacts can be in the form of rectangles, squares, dots or pixels, triangles, lines, etc. Moreover, artifacts can be of different colors i.e. green, yellow, red, blue, etc depending on the issue involved.
Artifacts in Windows at no Load
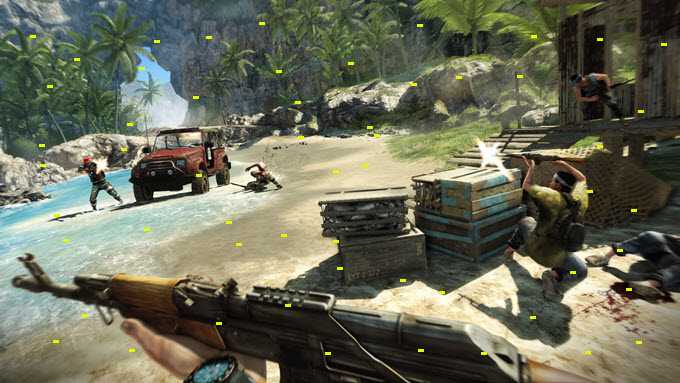
Artifacts when Gaming
Do Artifacts mean a dying GPU?
Well, in most cases artifacts do not necessarily mean a dying GPU because artifact issues or faults can be resolved or repaired. However, if your GPU core is damaged or faulty then the artifacts cannot be corrected or repaired and your GPU may die out eventually.
Types of Graphics Card Artifacts Scenarios
- Artifacts on Boot or BIOS Screen
- Artifacts on High GPU Load
- Artifacts on Idle and Load
- Artifacts in Gaming Only
- Artifacts at Startup (Windows)
- Artifacts in Particular Games or Applications
Major Causes of Graphics Card Artifacts & Fixes
Below are the main factors that can cause graphics card artifacts on your computer screen.
VRAM Overclocking
One of the most common causes of artifacts is because of issues with the VRAM or Video Memory of your graphics card. If you have overclocked your graphics card VRAM then you may get artifacts even if the overclocking software test tells you that the overclocking is stable. VRAM overclocking is one of the most common issues that result in artifacts all over your monitor’s screen. The artifacts show mainly during gaming or heavy loads. Generally, artifacts due to VRAM overclocking show up as yellow color dots squares, or pixels on the screen. These dots may appear permanent or flash intermittently. In the majority of cases, VRAM overclocking is not stable and should be avoided if you don’t want your video memory to fail. Moreover, the performance gain you get from VRAM overclocking is much less compared to GPU overclocking. So, if you have overclocked your VRAM along with GPU overclocking then you must disable the overclock for your video memory to get rid of artifacts and instability issues.
VRAM Overheating
VRAM overheating is another very common cause of artifacts especially during gaming or heavy workloads. Overheating of Video Memory happens because of VRAM overclocking, lack of thermal pads, improper size & thickness thermal pads, low-quality thermal pads, or because of poor GPU heatsink design for cooling the VRAM. If you have not overclocked your VRAM but your VRAM is overheating then you can take apart the graphics card heatsink to check if the thermal pads that are installed for the VRAM or are they making proper contact with the VRAM. If thermal pads are installed and do not cover the VRAM entirely then you must install the correct size and thickness thermal on the VRAM. If you find that the installed thermal pads are the proper size but are not making proper contact with the graphics card heatsink then you have to install the thermal pads of proper thickness. Here, one thing that you have to make sure that thermal pads are not too thick otherwise your GPU contact with the heatsink will not be proper and you will face the issue of GPU overheating. If everything is all right but your VRAM is still overheating because of poor heatsink design for cooling the VRAM then you can underclock your VRAM slightly so that it remains in the safe operating temperature range. The performance drop due to VRAM underclocking will be minimal in most games or programs.
Faulty VRAM
Another major cause of artifacts is a faulty VRAM module or chip. If one or more video memory chips on your graphics card have become faulty you will surely get artifacts on your monitor’s screen. The VRAM module can become faulty either because of a manufacturing defect or due to overheating or overclocking. It has also been seen that a particular batch of memory modules from the memory manufacturer can have some manufacturing issues and they are most likely to fail in the future. Also, it has been seen that memory modules from certain manufacturers are more reliable in terms of quality compared to others e.g. memory modules from Samsung are more reliable compared to memory modules from Micron and Hynix. For example, recently GeForce RTX 3060 Ti graphics cards having Hynix Memory with manufacturing code X005 are found to have some defects and are most likely to fail at some period of time. Such bad batches of memory chips can cause a lot of issues such as artifacts, instability, black screens, BSOD, and frequent crashes.
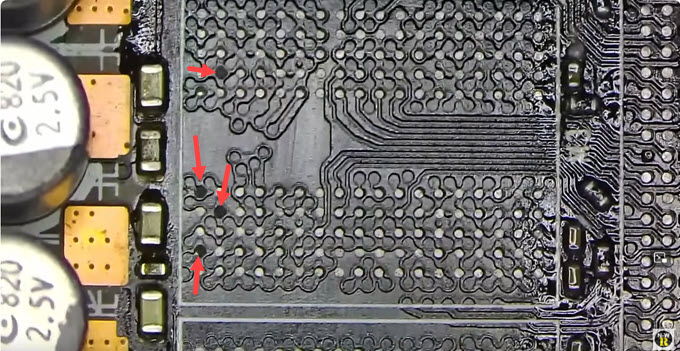
Testing of VRAM modules can be done using special software or tools that are complicated to run and are mostly used by GPU repair technicians. For example, Nvidia’s MODS (Modular Diagnostic Software) and MATS (Memory Automated Test System) are a set of tools to test VRAM on Nvidia’s graphics cards. It can detect the faulty memory modules on the card and also tell which modules or memory chips are bad so that they can be replaced by a professional graphics card repair technician. Below you can see the MODS/MATS software VRAM test results.
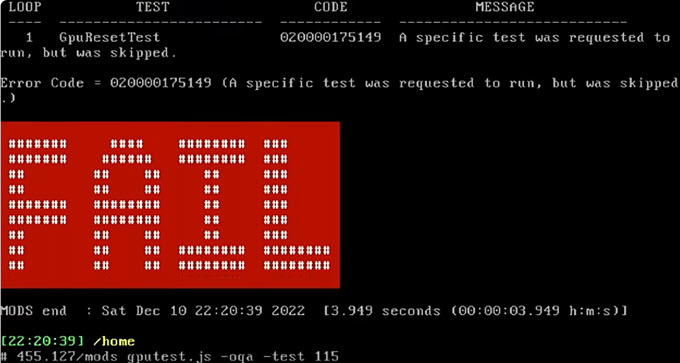
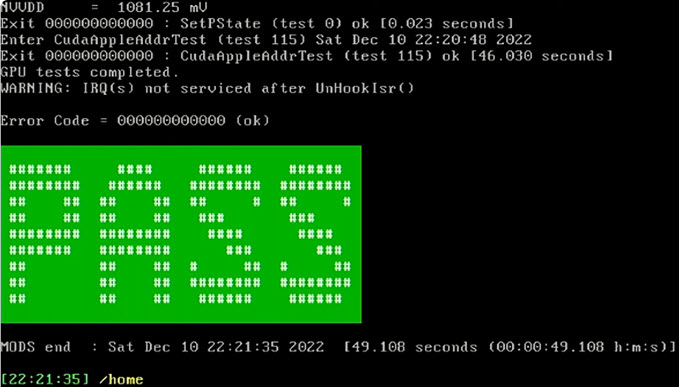
Note: A modified version of the MODS/MATS software is also there that can analyze and detect faulty VRAM modules in both Nvidia and AMD graphics cards including the latest ones.
GPU / VRAM Soldering Issue
GPU and VRAM memory chips use BGA mounting on the graphics card PCB using tiny solder balls for connection between the PCB and the Chip or IC. Sometimes, due to manufacturing defects, poor quality control, corrosion, or overheating the solder joints between the GPU / VRAM and PCB may become weak and lose contact with each other, causing many issues that can include artifacts. This problem can be solved by reflowing the process where the GPU / VRAM chip is heated to high temperatures using a hot air gun or on a BGA rework station to melt the solder joint to reestablish the connection between the chip and the PCB pads.
Damaged or Ripped Pads under GPU / VRAM
Sometimes the BGA soldering copper pads under the GPU or VRAM can get ripped from the PCB and lose connectivity. It can happen because of cracked PCB, dropping of graphics card from a decent height, manufacturing defects, or because of poor quality control. These BGA copper pads on the PCB can be repaired by removing the GPU / VRAM and then attaching new copper pads in the damaged area using soldering and glue. After fixing the pads by an expert technician, GPU or VRAM has to be reballed and then soldered back to their respective places.
Faulty GPU / Core
A faulty GPU or Core can also result in artifacts and may also fail to detect in the near future. Rarely does a GPU get faulty unless you are overvolting the card for stability during overclocking or improper voltage is being fed to the GPU because of faulty VRM circuitry due to damaged components that include MOSFETs, inductor/coils, resistors, etc. A graphics card with a faulty GPU cannot be repaired unless there is an exact donor GPU available at your disposal.
Graphics Driver Issues
Sometimes, artifacts may appear due to corrupted or buggy graphics drivers. If you started getting artifacts right after a graphics driver update then most likely the artifacts are due to updated graphics drivers. To fix this, you have to roll back to the previous graphics drivers by removing the updated drivers using the Display Driver Uninstaller (DDU) tool or software. Generally, artifacts due to buggy graphics drivers appear in some applications, programs, or software e.g. if you have artifacts appearing only in certain applications like Google Chrome Browser, Discord, Media Player (while Playing Videos), YouTube, etc. then it can be a video driver issue. Moreover, if you are noticing artifacts at the Windows startup screen only then it is also one of the indicators of corrupt or buggy video card drivers. Artifacts due to graphics driver issues can happen with both Nvidia or AMD drivers but it has been seen to happen more with AMD video drivers because of its history of unstable and buggy graphics drivers.
Game Issues
In some cases, artifacts appear only in particular games and not in others. This is a game-specific issue and it should be fixed by the game developer by releasing a patch. Also, some advanced graphics settings or advanced game technologies like Ray Tracing and image upscaling technologies like Deep Learning Super Sampling (DLSS) or AMD’s AMD FidelityFX Super Resolution (FSR) may cause artifacts if enabled in some AAA games. So, if you are facing artifacts in a particular game only then you don’t have to worry much as the underlying issue is with the game itself only.
Faulty Video Port
If one of the video ports of your graphics card is faulty then you may get visual defects or artifacts on your monitor’s display screen. For example, if your graphics card has two Display Ports and two HDMI ports and you are using an HDMI port and getting artifacts then you can switch to another HDMI port or DisplayPort to check whether all video ports are working fine or not. If you are getting artifacts with other video ports too then you have other issues causing screen artifacts. However, if the artifact problem goes away after using another video port then you have a damaged video port on your graphics card.
Note: Use of some Display Converter Adapter or Cables may also result in visual glitches and artifacts especially due to refresh rate issues. It is mostly seen in digital to analog converters e.g. HDMI to VGA adapter cables etc.
Faulty Display Cable
A faulty display cable can also cause screen glitches and artifacts. Sometimes the end connectors of the video cable get rusted or corroded and cause a weak connection resulting in artifacts. It is always recommended to use a branded display cable with a higher wire gauge and gold-plated connector terminals. In some cases, using a lower bandwidth display cable over a higher bandwidth video connection may also result in some kind of visual defects.
Monitor Issue
Monitor defects or issues that may result in artifacts. A faulty monitor does display some kind of lines or artifacts on its screen. Overclocking your monitor to display a higher refresh rate can also result in screen glitches and artifacts. Some monitors can have issues with displaying the highest refresh rate even when it is officially supported by the manufacturer. In such cases, lowering the refresh rate can solve the artifact issue.
PCIe x16 Slot Connection Issue
Sometimes a weak connection between your motherboard’s PCIe Slot and graphics card PCIe x16 connector can result in artifacts or other issues. It can happen because of fine dust or a sudden shock to the graphics card or PC Case. Reseating the graphics card and cleaning the PCIe x16 slot and PCIe x16 connector using 99% Isopropyl alcohol or electronic contact cleaner (WD 40 contact cleaner) can help.
How to test for GPU Artifacts
Most common ways to test graphics card artifacts.
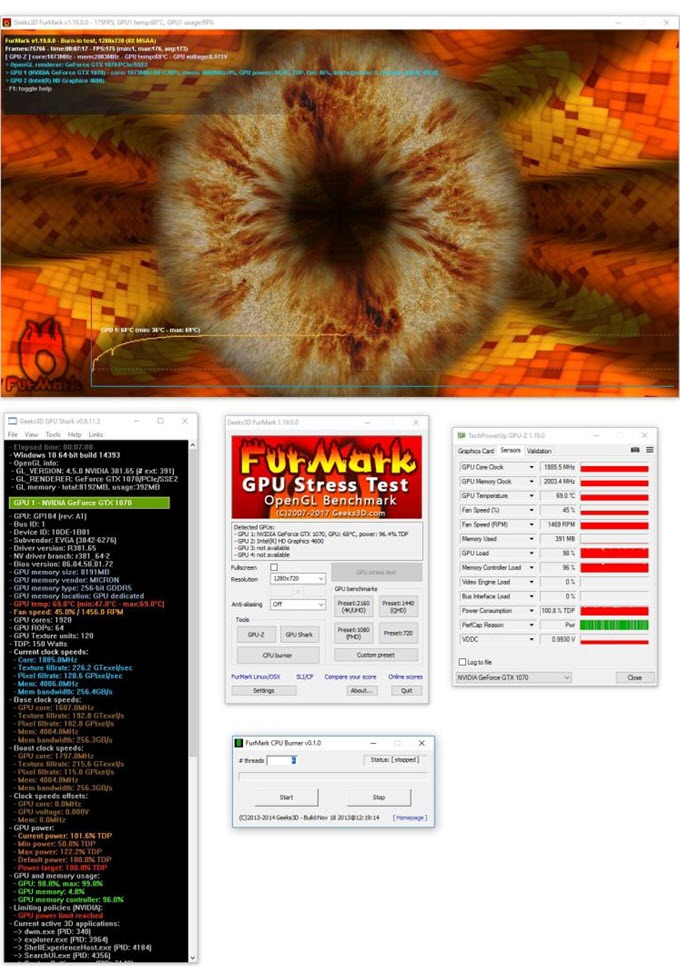
Running GPU Stress Test
Well, one of the easiest ways to check whether your graphics card is artifacting or not under load is by running GPU stress test software such as Furmark. Furmark is one of the most intensive graphics card benchmarking software and is free to use and download. If your graphics card passes the Furmark stress test without crashing or displaying artifacts and has good GPU, VRAM, and VRM temperatures during testing then your graphics card is OK.
With Onboard Graphics or Spare Graphics Card
If you have permanent or persistent artifacts on the screen without high GPU load and if you have onboard graphics or a spare graphics card then you can check the artifacts issue by switching to another graphics adapter or GPU (onboard / spare GPU). If you are not getting the artifacts using another GPU then your current graphics card is most likely defective.
Repair or RMA
If your graphics card is under warranty then it would be better to RMA the graphics card otherwise you have to get your graphics card repaired by a good GPU repair technician to solve the artifacts issue.
See also:
Need More Help?
If you need any more help regarding graphics card artifacts then do let me know your queries in the comment section below.
(*This post may contain affiliate links, which means I may receive a small commission if you choose to purchase through the links I provide (at no extra cost to you). Thank you for supporting the work I put into this site!)
![What PSU do I Need? [Complete Guide for Beginners]](https://graphicscardhub.com/wp-content/uploads/2020/04/what-psu-do-i-need-211x150.jpg "What PSU do I Need? [Complete Guide for Beginners]")

