
Building a PC is one thing, but building a PC with clean and organized cable management is another. Almost anyone can assemble computer components and get a system running, but arranging every cable neatly inside and outside the PC requires a little extra planning, patience, and attention to detail. The effort is worthwhile because a well-managed PC not only looks more professional but is also easier to maintain and work on in the future.
Many first-time PC builders think cable management is purely about aesthetics. While appearance is certainly one of the biggest reasons for organizing cables, it is far from the only one. Proper cable management can make routine maintenance easier, simplify hardware upgrades, improve airflow inside the case, and reduce the chances of accidentally disconnecting or damaging a cable while working on the system.
The good news is that you don’t need expensive accessories or professional skills to achieve good results. A few inexpensive tools, some basic planning, and the right routing techniques are usually enough to transform a cluttered build into one that looks neat and organized. Whether you are assembling your first gaming PC, upgrading an existing computer, or simply organizing the cables around your desk, this guide will help you understand the essential tools, accessories, and techniques required for effective cable management.
Types of PC Cable Management
PC cable management can be divided into two categories: internal cable management and external cable management. Although both have the same objective, keeping cables organized, they focus on different parts of your setup and require different accessories.
Internal Cable Management
Internal cable management refers to organizing and routing the cables inside the PC case. These include the motherboard power cable, CPU power cable, Graphics card power cable, SATA power and data cables, Case fan cables, RGB or ARGB cables, Front-panel connectors, etc.
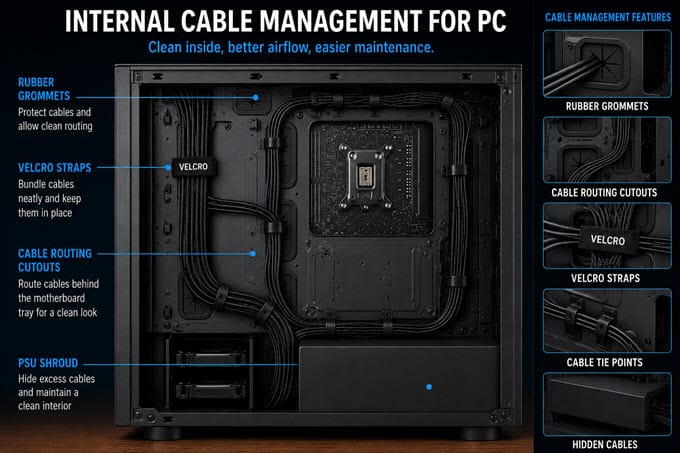
The goal is to route these cables neatly around the motherboard tray, through cable-routing cutouts, or behind the motherboard whenever possible. Modern PC cases often include rubber grommets, cable channels, tie-down points, and PSU shrouds specifically for this purpose.
Good internal cable management isn’t about hiding every single cable. Some cables, such as the graphics card power cable or CPU cooler cable, will almost always remain visible. What matters is that the visible cables follow clean, logical paths instead of crossing the motherboard randomly.
External Cable Management
External cable management focuses on organizing the cables outside the PC case. These usually include Monitor cables, HDMI or DisplayPort cables, Keyboard and mouse cables, Speaker cables, Ethernet cable, Power cords, USB charging cables, etc.
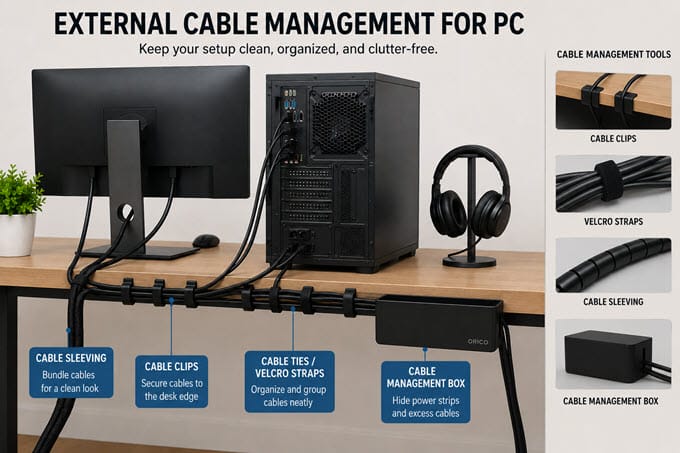
Many people spend considerable time making the inside of their PC look perfect but completely ignore the mess underneath or behind the desk. The result is a clean-looking computer sitting beside a bundle of tangled cables.
A tidy workspace should include both internal and external cable management. Organizing monitor cables, hiding the power strip, and securing charging cables can make your setup look significantly cleaner while making everyday use more convenient.
My Recommendation: If you’re building a new PC, organize the cables inside the case first and then spend a little time managing the cables around your desk. Treating both areas as one project usually produces the best overall result.
Benefits of Proper Cable Management
Cable management requires a little extra effort during assembly, so it’s natural to wonder whether it’s really worth the time. In my experience, the answer is yes. While good cable management won’t magically improve your PC’s performance, it offers several practical advantages that you’ll appreciate every time you upgrade, clean, or troubleshoot your system. Let’s look at the major benefits.
Cleaner and More Professional Appearance
The most obvious benefit is aesthetics. A neatly organized PC immediately looks more attractive than one with cables running in every direction. If your case has a tempered glass side panel, clean cable management allows the hardware to stand out instead of being hidden behind a mess of wires.
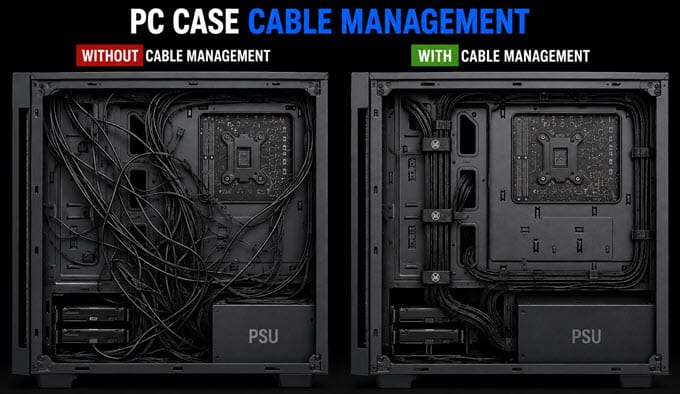
The same applies to your desk. Organizing monitor cables, power cords, and peripherals creates a cleaner workspace that feels more comfortable to use. A tidy setup also reflects the care you’ve taken while assembling your PC. Whether it’s a gaming rig or a workstation, neat cable management always leaves a better impression.
Better Airflow
One of the most commonly discussed advantages of cable management is improved airflow. Loose cables hanging in front of intake or exhaust fans can partially obstruct airflow inside the case. By routing cables along the edges of the chassis and behind the motherboard tray, you reduce unnecessary obstructions and allow air to move more freely.
It’s important to keep expectations realistic, though. Cable management alone won’t dramatically lower CPU or GPU temperatures. Cooling performance still depends mainly on your case, fans, and airflow design. However, removing cable clutter from major airflow paths certainly helps maintain efficient cooling.
Easier Troubleshooting
Few things are more frustrating than tracing a loose cable through a cluttered PC. When cables are grouped neatly and routed logically, identifying a disconnected fan, replacing a storage drive, or checking a power connector becomes much easier. You spend less time searching for the correct cable and more time solving the actual problem. This becomes particularly useful if you regularly upgrade your hardware or troubleshoot different components.
Easier Cleaning
Dust naturally accumulates inside every computer over time. A well-organized interior makes routine cleaning much simpler because you can access fans, filters, and other components without fighting through tangled cables. It also reduces the likelihood of accidentally pulling a connector loose while using compressed air or a soft brush. Keeping your PC clean not only improves its appearance but also helps maintain cooling performance over the long term.
Reduced Risk of Accidental Damage
Loose cables can sometimes create unexpected problems. Inside the case, an unsecured cable may touch a spinning fan, resulting in unwanted noise or even damage. Outside the case, tangled cables can easily be pulled accidentally when moving the PC, adjusting the monitor, or cleaning the desk. Proper cable management reduces these risks by securing cables in predictable locations where they’re less likely to be disturbed.
Makes Future Upgrades Easier
Very few PCs remain unchanged throughout their lifetime. You might install another SSD, replace the graphics card, upgrade the power supply, or add more case fans. If the cables are already organized into logical groups, these upgrades become much easier because you don’t have to untangle a maze of wires before getting started. This is one of the biggest reasons experienced builders spend extra time on cable management during the initial assembly.
Good cable management is not about perfection; it’s about organization, accessibility, and planning. Once you understand the difference between internal and external cable management and the practical benefits of organizing your cables, choosing the right tools becomes much easier.
Internal Cable Management Tools and Accessories
Internal cable management is mainly about securing, routing, and organizing cables inside the PC case. Most modern cases already include features such as cable-routing cutouts, rubber grommets, tie-down points, and PSU shrouds, but a few simple accessories can make the job much easier.
Zip Ties (Cable Ties)
Zip ties are the most widely used cable management accessory, and for good reason. They’re inexpensive, easy to use, reliable, and strong enough to hold multiple cables securely together. Inside a PC, zip ties are commonly used to bundle groups of cables or secure them to the tie-down points behind the motherboard tray. Once tightened, they keep the cables firmly in place and prevent them from moving around during transport or maintenance.
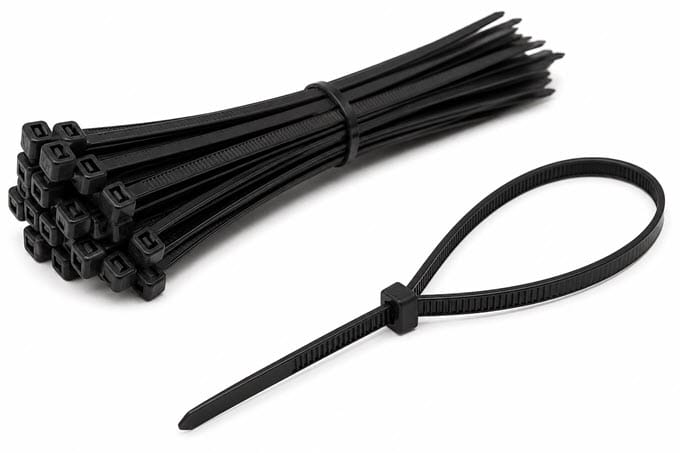
Zip ties are made of Nylon and are available in different lengths and colors, although black is the most common choice because it blends well with most PC interiors. The biggest drawback is that they are designed for single use. If you later add another SSD, replace a graphics card, or install additional fans, you’ll have to cut the existing zip tie and replace it with a new one.
Note: Although reusable zip ties are also available, they are not as reliable as the traditional single-use zip ties. Reusable cable ties have lower strength and are not practical for use in PC cable management.
Zip Ties Recommendations
- Cable Zip Ties, 400 Pack Black Assorted Sizes 12/8/6/4 Inch
- Zip Ties 8 inch (100 Pack), 40lbs Tensile Strength
- Colored Zip Ties 4-inch (Pink, Red, Purple, Yellow, Blue, Green)
- Colored Zip Ties 8-inch (Red, Yellow, Orange, Green, Blue, Purple)
Velcro Straps
Velcro straps are another popular cable management accessory and an excellent alternative to zip ties. Unlike zip ties, Velcro straps are reusable. You can open, adjust, and fasten them again as many times as needed, making them ideal for builders who frequently upgrade their systems.
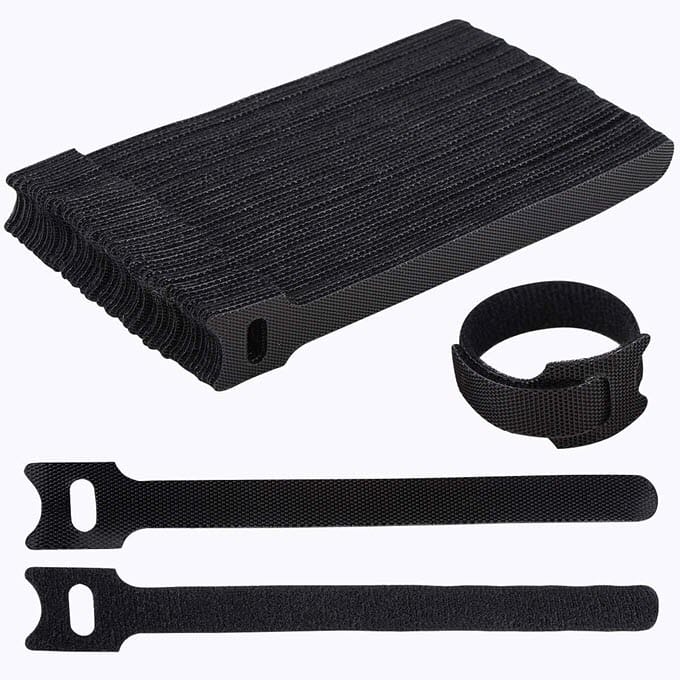
They are available as pre-cut straps or in roll form, allowing you to cut custom lengths for larger cable bundles. The only downside is that they don’t hold cables quite as tightly as zip ties. They can also collect dust, hair, and small debris over time, although this rarely affects their usability. For cable bundles that may need future adjustments, I usually prefer Velcro straps over zip ties.
Velcro Straps Recommendations
- Velcro Straps 6-inches Reusable
- Velcro Cut-to-length Straps Roll
- Colored Velcro Straps (Black, Blue, Yellow, Red, Green)
Cable Combs for PSU Cables
Cable combs are designed specifically for individually sleeved PSU cables and cable extension kits. Their purpose is simple: they keep each wire evenly spaced so the cable bundle looks straight and organized.
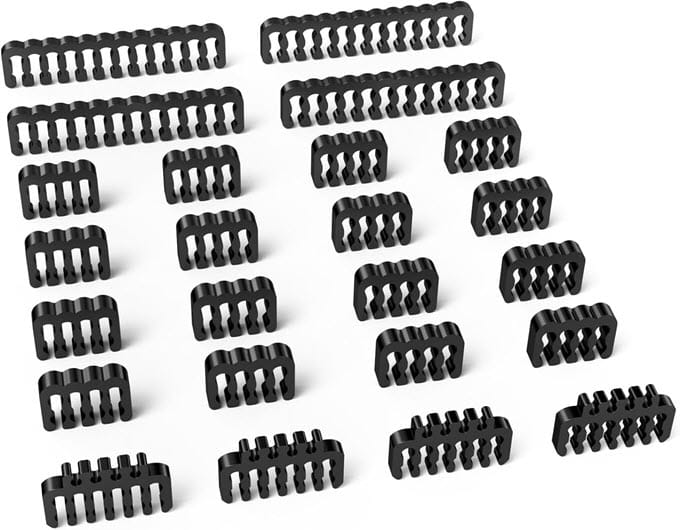
If you’ve seen premium custom-built PCs with perfectly aligned PSU cables, cable combs were almost certainly used. They’re available in different sizes and colors, allowing you to match the overall theme of your build. However, cable combs are mainly cosmetic accessories. If you’re using the flat ribbon cables included with most power supplies, they provide very little benefit.
Tip: Buy cable combs only if you’re using individually sleeved PSU cables or extension cables. Most mainstream gaming PCs don’t really need them.
PSU Cable Combs Recommendations
External Cable Management Accessories
Internal cable management makes the PC look clean, but external cable management completes the setup. Monitor cables, keyboard cables, power cords, and charging cables can quickly create a messy workspace if left unmanaged. Fortunately, a few simple accessories can organize them neatly without much effort.
Cable Sleeves (Braided Cord Protectors)
Cable sleeves are one of the easiest ways to organize multiple cables running behind your desk. Instead of leaving every cable separate, a sleeve bundles them together into one neat cable run. This immediately improves the appearance of the workspace and also reduces cable tangles.
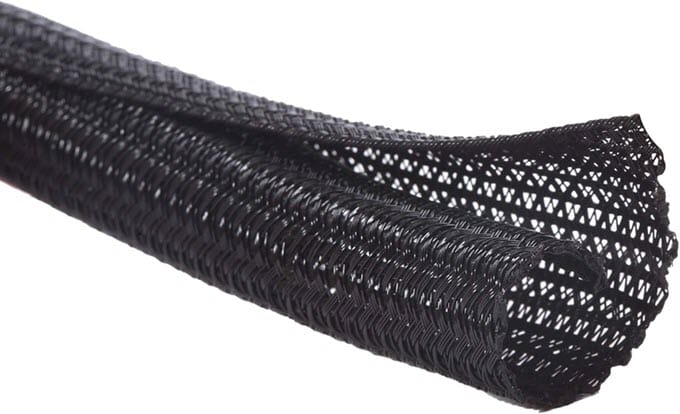
Braided Cable sleeves are generally made from Nylon or synthetic fabric and help protect cables from pets such as cats and dogs that may chew exposed wires. They also reduce general wear caused by cables rubbing against desk edges or being pulled during cleaning. Cable sleeves are available in various diameters and lengths, so choose one that comfortably fits the number of cables you intend to organize. Black remains the most popular color because it blends well with most desks and computer setups, although other colors are also available.
Tip: If your desk has several monitor, speaker, and peripheral cables, a cable sleeve is probably the single best external cable management accessory you can buy.
Braided Cable Sleeve Recommendations
Zipper Cable Sleeve
A zipper cable sleeve is one of the easiest and most effective ways to organize multiple cables without disconnecting them. Unlike standard cable sleeves that require you to thread each cable through the sleeve, a zipper cable sleeve simply wraps around the cable bundle and closes with a zipper. This makes installation much quicker, especially if you’re organizing an existing PC setup with several connected devices.
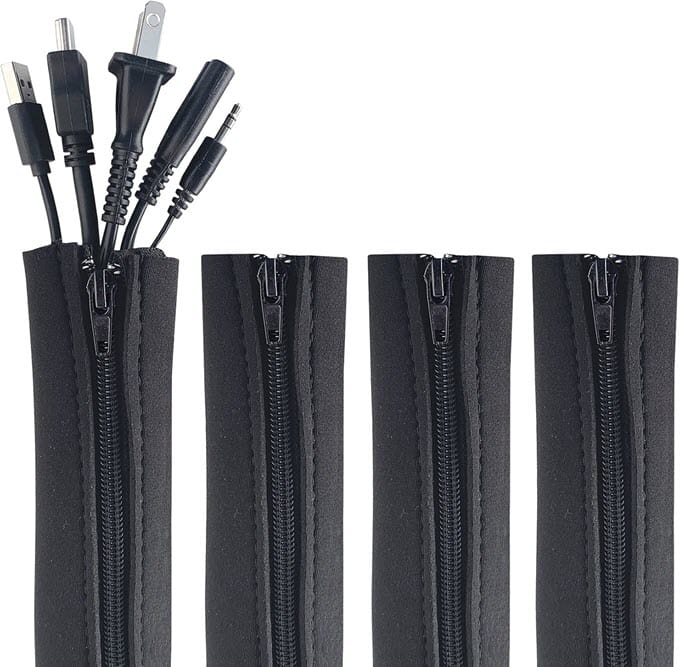
Most zipper cable sleeves are made from flexible neoprene or fabric, allowing them to expand and accommodate multiple cables, including power cords, HDMI, DisplayPort, Ethernet, USB, and audio cables. Depending on the size, a single sleeve can typically hold 8 to 10 cables, making it ideal for gaming PCs, workstations, dual-monitor setups, and home entertainment systems. Some models also include connector buckles or built-in cable exit openings for routing individual cables where needed.
The biggest advantage of a zipper cable sleeve is convenience. If you add a new monitor, replace a peripheral, or upgrade your PC, you can simply unzip the sleeve, insert or remove the cable, and zip it back up. There’s no need to unplug every cable or replace the entire sleeve, which is often necessary with traditional cable sleeves.
Another benefit is protection. A quality neoprene sleeve helps protect cables from dust, abrasion, accidental snags, and even curious pets that like to chew exposed wires. At the same time, it gives your desk a cleaner, more organized appearance by hiding multiple loose cables inside a single sleeve.
The only drawback is that zipper cable sleeves are generally bulkier than braided sleeves or spiral wraps. If you’re routing only two or three thin cables, a standard braided sleeve may provide a slimmer and more discreet solution.
Tip: If your gaming PC or workstation has multiple monitors, power, USB, and network cables running behind the desk, a zipper cable sleeve is one of the best cable management accessories you can buy. It’s inexpensive, easy to install, reusable, and makes future cable changes much simpler than traditional cable sleeves.
Zipper Cable Sleeve Recommendations
Under-Desk Cable Management Tray
Power strips and bulky power adapters often create the biggest mess underneath a desk. An under-desk cable management tray provides a convenient place to mount the power strip while hiding excess cable length above floor level.
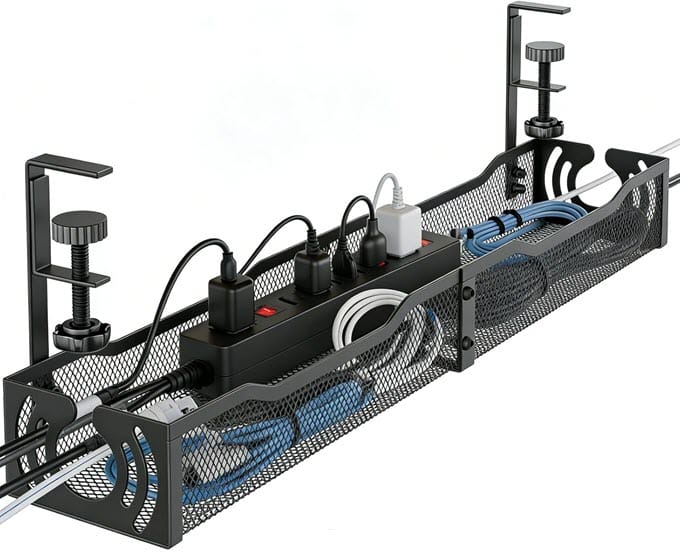
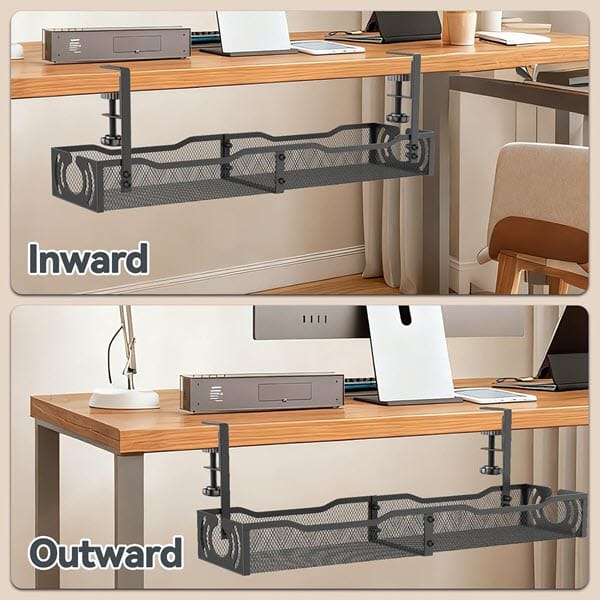
These trays are available in inward and outward installation styles and are offered in both drill-mounted and clamp-mounted versions. Clamp-based models are generally more popular because they’re easier to install and don’t require drilling holes in the desk. They are also available in different sizes to accommodate different setups. If you’re setting up a home office or gaming desk, a cable tray can make a dramatic improvement with very little effort.
Under-Desk Cable Management Tray Recommendations
- Under Desk Cable Management Tray (No Drill, Metal Mesh, Black/White)
- Under Desk Cable Management Tray (Clamp based, Mesh, Multiple Sizes, Black/White)
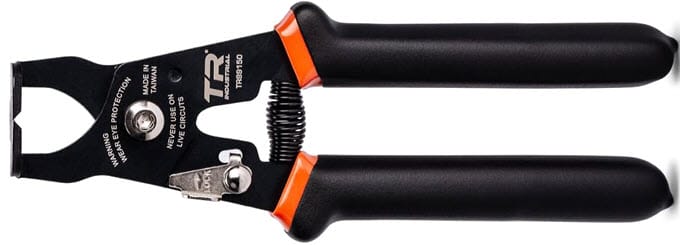
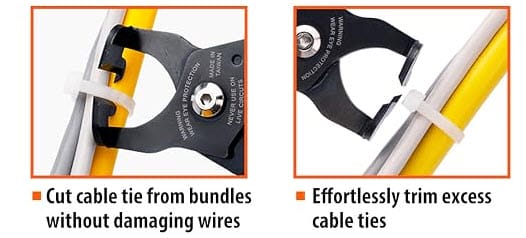
Cable Tie Cutter
After trimming dozens of zip ties, you’ll quickly appreciate the usefulness of a proper cable tie cutter. This tool is designed to cut zip ties cleanly without leaving long, sharp plastic ends. A dedicated cable tie cutter isn’t essential if you already own a small side cutter, diagonal cutting pliers, or a flush cutter. So, while it’s a useful tool, it’s certainly not something every builder needs to purchase separately. However, if you are an enthusiast, then it can be a worthy addition to your toolkit.
Recommendation
Side Cutter (Diagonal Cutting Pliers)
A side cutter is one of the most practical tools you can own for PC building. Besides cutting zip ties, it can also cut electrical wire, small metal wire, and various other materials used during hardware installation. Because of its versatility, many PC enthusiasts already have one in their toolbox, making a dedicated cable tie cutter unnecessary.
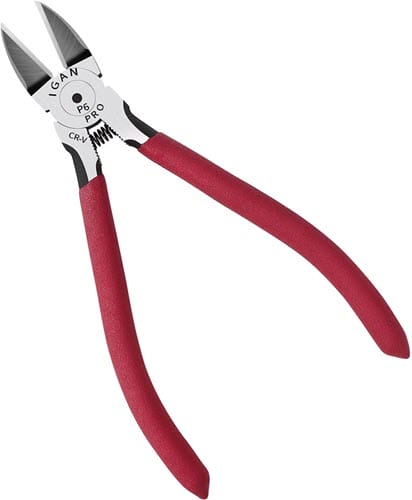
Tip: If you’re buying only one cutting tool, choose a good-quality side cutter. You’ll use it for far more than just cable management.
Side Cutter Recommendation
Cable Labels
If you have more than a few cables connected to your PC, monitor, router, speakers, or peripherals, cable labels can save you a lot of time. They let you identify each cable instantly, so you don’t have to unplug multiple cables to find the right one.
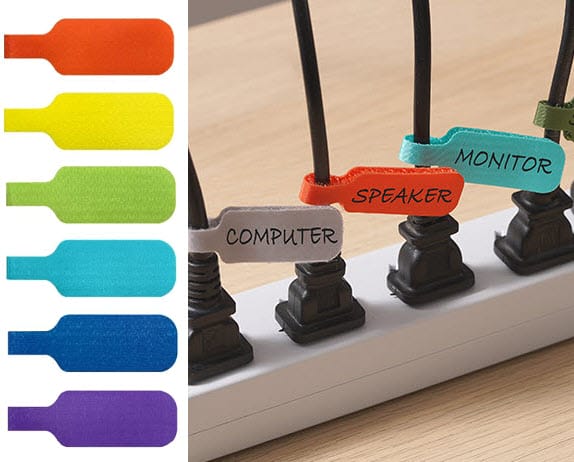
Modern cable labels are typically made from durable Nylon or polyester and use a hook-and-loop (Velcro-style) closure instead of adhesive. Cable labels are available in different colors and sizes to suit different requirements and setups. Simply wrap the label around the cable, write the cable name with a permanent marker or pen, and secure it in place. Since they are reusable, you can easily remove and reuse them whenever you rearrange your setup or upgrade your hardware.
Cable labels are especially useful for gaming PCs and workstations with multiple monitors, external storage drives, USB hubs, speakers, and networking equipment. Labeling cables such as Monitor 1, Monitor 2, Keyboard, Mouse, Ethernet, Printer, or UPS makes troubleshooting, cleaning, and upgrading much easier. Instead of tracing each cable manually, you can identify the correct one at a glance.
Another advantage is that cable labels work well alongside other cable management accessories such as cable sleeves, raceways, Velcro straps, and cable trays. While these accessories keep cables organized, labels ensure you know exactly what each cable is connected to without opening the entire bundle.
Tip: Cable labels are inexpensive but surprisingly useful. If your desk has more than five or six cables, they’re worth buying. A reusable write-on label with a hook-and-loop design is the best option because it won’t leave adhesive residue, can be updated whenever your setup changes, and makes future upgrades or troubleshooting much easier.
Recommendation
Cable Management Organizer Kits
If you’re starting from scratch, cable management kits are worth considering. These kits typically include a variety of accessories such as zip ties, Velcro straps, adhesive cable clips, cable sleeves, and mounting bases.
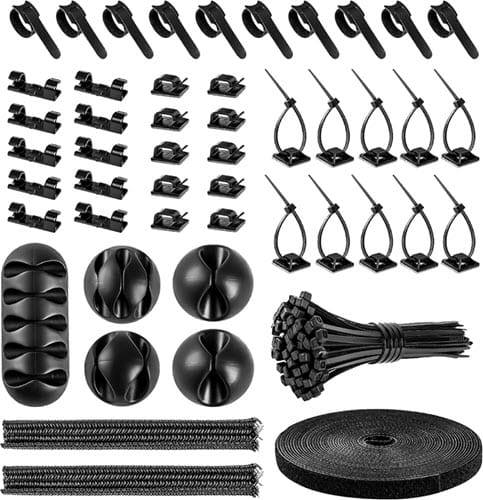
Buying everything together can be more convenient for some users than purchasing each item separately, especially if you’re organizing an entire workstation. However, don’t assume that a larger kit is automatically better. Focus on quality rather than the number of included pieces.
Other Cable Management Accessories
Several smaller accessories can be useful in certain situations. These include self-adhesive cord holders and self-adhesive mounting bases. Cord holders are particularly useful for keeping charging cables within easy reach on a desk. At the same time, adhesive mounting bases provide additional tie-down points for securing cable bundles where the PC case or desk doesn’t already have them. Although these accessories aren’t essential for every setup, they can solve specific cable management problems quickly and inexpensively.
Which Tools and Accessories Do You Really Need?
It’s easy to get carried away and buy every cable management product you see online, but for most PC builders that’s unnecessary.
If you’re assembling a typical gaming PC, I recommend starting with:
- Zip ties
- Reusable Velcro straps
- A side cutter
- A cable sleeve for desk cables
These four items will handle most cable management tasks both inside and outside your PC. Accessories like cable combs, cable tie cutters, cable trays, and organizer kits can always be added later if your setup requires them. Good cable management is far more about planning than buying accessories. Even the best cable management kit can’t compensate for poorly routed cables.
PC Cable Management Tips
Having the right tools certainly makes cable management easier, but tools alone won’t guarantee a clean-looking PC. The way you plan and route your cables has a much bigger impact than the number of accessories you own. Two builders can use the same PC case and the same hardware yet end up with completely different results simply because one follows a logical cable routing approach while the other connects cables randomly.
There is no single cable management layout that works for every PC. Different cases provide different amounts of routing space, cable channels, and tie-down points. Likewise, components from different manufacturers often use cables of varying lengths, making cable management easier in some builds and more challenging in others. The following tips will help you get the most out of whatever hardware and PC case you have.
Use the PC Case’s Cable Management Features
Modern PC cases include several features specifically designed to simplify cable management. These may include rubber grommets, cable-routing cutouts, cable channels, tie-down points, and PSU shrouds.
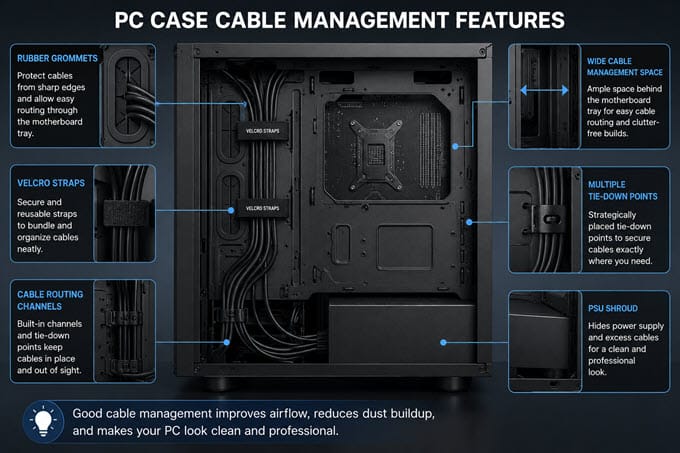
Instead of routing cables directly across the motherboard, use these built-in features whenever possible. Route cables behind the motherboard tray and bring them back through the nearest cutout to their destination. This keeps the visible side of the build much cleaner and reduces unnecessary cable clutter. If your PC case has rubber grommets, make full use of them. Besides improving the appearance of the build, they also help protect cables from rubbing against the sharp edges of the metal chassis.
Group Cables that follow the same path
Before reaching for a Zip tie or Velcro strap, identify which cables are heading in the same general direction and bundle those together as a set. This keeps routing logical and makes it much easier to trace a specific cable later.
Avoid Sharp 90-Degree Cable Bends
Avoid making a sharp 90-degree bend immediately after a connector or component. Doing so can place stress on the connector, loosen the connection over time, or even damage the connector if excessive force is applied. Instead, allow the cable to curve naturally before routing it toward the nearest cable-routing opening. This is particularly important for thicker motherboard power cables and graphics card power cables, which don’t bend as easily as thinner fan or front-panel cables.
Read also: Top Ways to Prevent 12VHPWR / 12V-2×6 Connector from Melting
Trim Excess Zip Tie Ends
After securing cable bundles with zip ties, always trim the excess plastic ends. Long zip tie tails not only look untidy but can also interfere with nearby cables during maintenance. Use a cable tie cutter, side cutter, or flush cutter to make a clean cut. Be careful not to damage the cable insulation while trimming the zip ties, especially when working in tight spaces. Cleanly trimmed zip ties give the finished build a much more professional appearance.
Use Colored Zip Ties or Velcro Straps for Identification
Black zip ties are the most common choice because they blend well with most PC builds, but colored zip ties and Velcro straps can also be useful. You can use different colors to identify cable groups more easily. For example, one color can be used for fan cables while another is reserved for storage or RGB cables. This can make future troubleshooting and upgrades quicker because you can identify cable groups at a glance. This approach is particularly helpful for workstations or systems with multiple storage drives and numerous fans.
Don’t Overuse Zip Ties
Zip ties are extremely useful, but more isn’t always better. If every cable is secured with multiple zip ties, future upgrades become unnecessarily difficult because you’ll have to cut and replace many of them to install a new component.
Use zip ties where you want a permanent cable bundle and use reusable Velcro straps in areas where changes are likely, such as around storage drives or fan hubs. Also, avoid tightening zip ties excessively. They only need to hold the cables securely together. Overtightening them can place unnecessary pressure on the cables and make future adjustments more difficult. Also, overtightening can make cutting the tie later without clipping neighboring cables difficult.
Keep External Cables Organized
Cable management doesn’t end once the side panel is closed. Monitor cables, power cords, Ethernet cables, and charging cables can quickly become tangled if they’re left hanging behind the desk. Use cable sleeves, cable clips, or a cable tray to group similar cables together and keep them off the floor. Not only does this make the workspace look cleaner, but it also reduces the chance of accidentally pulling a cable while moving the chair or cleaning around the desk. A tidy desk complements a tidy PC.
Avoid Overlapping Cable Bundles
Avoid routing one cable bundle directly over another whenever possible. Crossing large cable bundles can create unnecessary bulk behind the motherboard tray, making the rear side panel harder to close. Instead, keep each cable bundle separate and route it along its own path whenever practical. A little planning usually produces a much cleaner result.
Consider a Modular Power Supply
If you’re planning to upgrade your power supply in the future, choosing a modular or semi-modular PSU can simplify cable management. Unlike non-modular units, modular power supplies allow you to connect only the cables your system actually requires, reducing unused cable clutter inside the case.
However, upgrading an otherwise perfectly good power supply solely for cleaner cable management is usually unnecessary. Most modern PC cases provide enough room to organize unused cables neatly behind the motherboard tray or inside the PSU shroud.
Upgrade to a PC Case with Good Cable Management
Not all PC cases offer the same cable management experience. Some include generous routing space, multiple tie-down points, and well-designed cable channels, while others provide very limited room behind the motherboard tray.
Upgrading to a larger PC case with a better cable management layout is an option if you’re already planning a new build or replacing your existing case. However, it shouldn’t be considered a requirement. Good planning can still produce excellent results in many budget-oriented cases.
Route Cables Around the Motherboard
Whenever possible, route cables around the edges of the motherboard instead of across its surface. This simple habit keeps the center of the motherboard clear, improves the overall appearance of the build, and allows the major components to remain the visual focus. Although a few cables will always remain visible, careful routing around the motherboard borders creates a much cleaner-looking system.
See also:
Final Words
Good cable management is a skill that improves with experience. The first PC you build may not look perfect, and that’s completely normal. Every build teaches you something new about cable routing, cable length, and the layout of different PC cases. Remember that cable management isn’t about hiding every wire. It’s about creating an organized system that is easy to maintain, simple to upgrade, and pleasant to look at. Even a few basic improvements, such as routing cables through the nearest cutout, securing loose cable bundles with zip ties or Velcro straps, and organizing the cables behind your desk, can make a noticeable difference.
You also don’t need to buy every cable management accessory available. For most PC builders, a pack of zip ties, a few reusable Velcro straps, a side cutter, and a cable sleeve are enough to achieve clean and effective cable management. Additional accessories can always be added later if your setup requires them. Finally, remember that every PC case and every hardware configuration is different. Don’t worry if your cable routing doesn’t look exactly like someone else’s build. Use the features provided by your case, keep similar cables grouped, avoid unnecessary cable clutter, and focus on creating a setup that is both practical and easy to work on. With a little planning and patience, you’ll not only have a cleaner-looking PC but also one that’s easier to clean, troubleshoot, and upgrade for years to come.
(*This post may contain affiliate links, which means I may receive a small commission if you choose to purchase through the links I provide (at no extra cost to you). Thank you for supporting the work I put into this site!)
![How to Lower RAM Usage for PC & Laptop [Top Tips & Tricks]](https://graphicscardhub.com/wp-content/uploads/2021/09/fix-high-ram-usage-211x150.jpg "How to Lower RAM Usage for PC & Laptop [Top Tips & Tricks]")
![How to Check SSD Health? [SSD Health Check Utilities & Tips]](https://graphicscardhub.com/wp-content/uploads/2021/12/ssd-health-check-211x150.jpg "How to Check SSD Health? [SSD Health Check Utilities & Tips]")
![Should you Buy a Used Graphics Card for Gaming? [Answered]](https://graphicscardhub.com/wp-content/uploads/2021/08/should-you-buy-a-used-graphics-card-211x150.jpg "Should you Buy a Used Graphics Card for Gaming? [Answered]")
