Resetting a graphics card can mean a few different things. It may mean restoring the graphics card driver, clock speeds, profiles, and settings to their defaults, or it may involve physically removing and reinstalling the graphics card in the PCIe x16 slot. Resetting the graphics card can help troubleshoot various video and graphics-related problems, including a black screen, no video signal, screen flickering, pixel issues, random graphics driver crashes, low performance, and frozen screens in Windows 11 and Windows 10.
A GPU reset doesn’t always fix graphics card problems because the underlying cause may involve hardware, power delivery, overheating, the PCIe slot, the display cable, the monitor, or another component. However, resetting the graphics subsystem, restoring GPU settings, reinstalling the graphics driver, or reseating the graphics card are useful troubleshooting steps. You can reset a graphics card in several ways. The method you use depends on the problem you are experiencing and whether you want to reset the software configuration or physically reconnect the GPU. Whether you’re on a laptop or a desktop, here are all the ways to reset your video card properly, along with when each method makes sense.
Signs You Might Need to Reset Your Graphics Card
These are the situations where a GPU reset might be needed:
- The screen goes completely black while the PC is clearly still running (fans spinning, no shutdown).
- You get “No Signal” on the monitor after waking from sleep or after a game crashes.
- The display flickers, shows pixel corruption, or briefly loses signal at random.
- Your GPU driver keeps crashing and recovering (you’ll usually see a notification).
- The screen freezes completely and stays frozen until you force a restart.
- Colors look wrong, resolution reverts on its own, or refresh rate settings won’t stick.
Software Reset
A software reset does not require physically removing the graphics card. It involves resetting the Windows graphics subsystem, disabling and enabling the GPU, restoring GPU clock speeds, reinstalling the graphics driver, or rolling back to a previous driver version. You can use the following methods to reset or troubleshoot the graphics card in Windows 11 and Windows 10.
Win + Ctrl + Shift + B Shortcut
Microsoft Windows 10 and 11 include a keyboard shortcut you can use when the screen goes blank or black.
Press Win + Ctrl + Shift + B simultaneously on the keyboard.
According to Microsoft’s official description, this shortcut can “Wake up the device when the screen is blank or black.” It is primarily intended as a diagnostic tool for display problems when the computer is still running, but nothing is visible on the screen. After pressing the shortcut, you may hear a short beep, and the display may briefly go black or flicker before returning to normal.

The Win + Ctrl + Shift + B hotkey does not restart or reset the graphics driver. Its original purpose was to provide a diagnostic mechanism for troubleshooting issues with third-party GPU drivers, particularly when the system is running, but the display has gone blank. The shortcut also saves a portion of the display diagnostic log and queues the information for telemetry, indicating that the user experienced a black-screen condition. Technically, the shortcut resets the graphics subsystem on the Windows machine. One of the things that can happen as a side effect is graphics driver recovery or reset, but this is not its primary purpose and is not guaranteed.
The process discards the desktop surface buffer and recreates the allocation used by the Desktop Window Manager (DWM), which relies on hardware acceleration to render the Windows desktop. Therefore, use Win + Ctrl + Shift + B primarily when you experience a black screen, blank display, or similar graphics problem, rather than repeatedly pressing the shortcut when the system is working normally. If the screen does not return after using the shortcut, the problem may require additional troubleshooting.
Reset via Device Manager
Another way to reset the graphics card is through Windows Device Manager. This method allows you to disable and re-enable the GPU or uninstall the graphics device so Windows can detect it again. To access the graphics card in Device Manager, open the Control Panel and go to Device Manager. Expand Display adapters to see the installed graphics card. Right-click your graphics card and select Disable device.
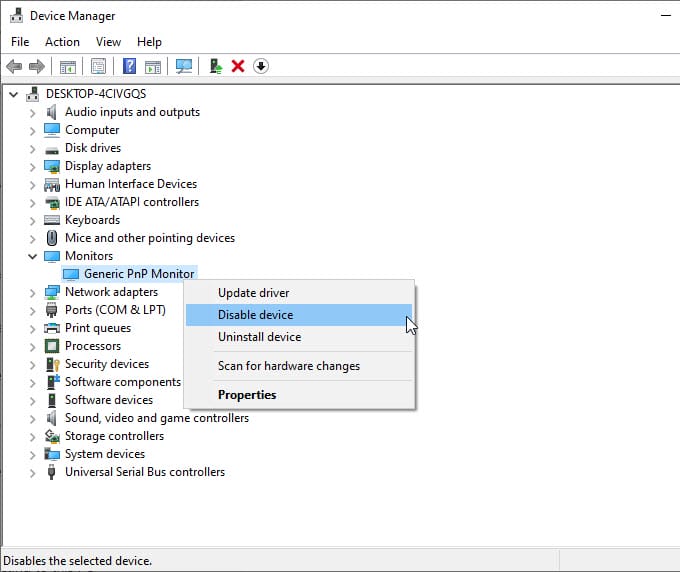
The display may temporarily stop working or flicker when you disable the graphics adapter. After disabling it, right-click the graphics card again and select Enable device. This effectively forces Windows to disable and reinitialize the graphics adapter.
If you select Uninstall device instead, Windows will remove the graphics device from Device Manager. After uninstalling it, click Display adapters and select Action > Scan for hardware changes. Windows should detect the graphics card and reinstall the device.
This method can help when Windows doesn’t detect or initialize the GPU properly. However, uninstalling a graphics device through Device Manager is not the same as performing a complete graphics driver removal. If you suspect a corrupted or conflicting driver installation, a clean graphics driver installation is generally a better approach.
Reset GPU and Memory Clock Speeds
If you manually overclocked the GPU or memory using MSI Afterburner or another graphics card overclocking utility, restoring the clock speeds to their default values is another way to reset the graphics card. An unstable GPU overclock can cause screen flickering, application crashes, driver crashes, graphical artifacts, black screens, blue screens, and system freezes. If you are troubleshooting an overclocked graphics card, returning the GPU to its default settings should be one of your first steps.
Reset GPU to Factory Settings Using MSI Afterburner
MSI Afterburner can be used to restore active GPU settings to their default values.
> Open MSI Afterburner on your PC.
> Find the Reset button, shown as a circular arrow icon at the bottom of the control panel.
> Click Reset to restore the active settings, including the GPU core clock, memory clock, voltage, and fan speed, to their default values.
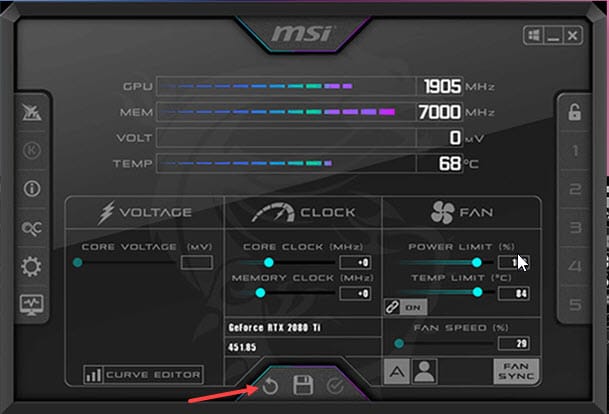
> After resetting the settings, click Apply (the checkmark icon).
The GPU should now operate using its default settings rather than the manually configured overclock or custom profile. If the graphics card becomes stable after you return to the default settings, the previous overclock or custom configuration may have caused the problem. Keep in mind that MSI Afterburner is primarily a graphics card tuning utility. It does not repair a physically defective GPU or correct every type of driver problem.
Reinstall Graphics Driver
Reinstalling the graphics driver can solve many graphics-related problems, including blue screens, graphics driver crashes, screen flickering, low performance, graphical glitches, and other display problems. A normal driver update does not always remove every component of the previous installation. Corrupted files, incorrect settings, driver conflicts, or leftover components can still cause problems. For this reason, a clean graphics driver installation can be useful when troubleshooting persistent GPU problems. The most reliable and popular tool for completely removing graphics drivers is Display Driver Uninstaller (DDU).
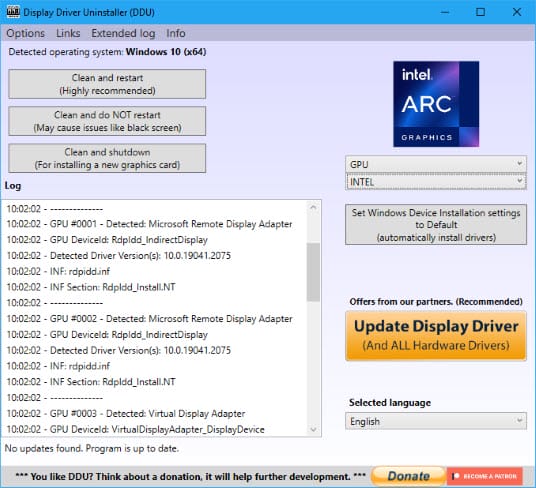
DDU removes installed graphics drivers and associated components from Windows. It removes residual driver files and registry entries that can remain after a conventional driver uninstall. DDU supports NVIDIA, AMD, and Intel graphics cards. A typical clean installation involves first downloading the correct graphics driver for your GPU, removing the existing driver with DDU, restarting the computer, and then installing the freshly downloaded driver. A clean driver installation is especially useful if graphics problems started after a driver update or if the existing installation may have become corrupted.
Download Display Driver Uninstaller (DDU)
Check out: Top GPU Driver Removal Tools for Windows
Important Note: Always download the new graphics driver from your GPU manufacturer’s official website.
For NVIDIA graphics cards, download the driver from the official NVIDIA driver page.
For AMD graphics cards, use AMD’s official support and driver download page.
For Intel graphics products, use Intel’s official driver support page.
Roll Back Graphics Driver
Sometimes the latest graphics driver may cause graphics-related problems. A new driver may contain bugs or compatibility problems that affect a particular graphics card, game, application, or Windows configuration. If the problem appeared immediately after upgrading the graphics driver, rolling back to a previous stable version may help.
The general approach is to remove the problematic driver and install an earlier version that was working correctly. You can use Display Driver Uninstaller or another suitable graphics driver removal tool to completely remove the current driver before installing the previous version. When selecting an older driver, choose a version known to work correctly with your graphics card and Windows version.
Driver rollback can be especially useful when a GPU was stable before an update but began crashing, flickering, showing black screens, or displaying graphical artifacts or performance problems afterward. Always download graphics drivers from the GPU manufacturer’s official website, not an unknown third-party download source.
Reset GPU BIOS / VBIOS (For Advanced Users Only)
Another possible method is resetting or restoring the GPU BIOS, also known as the VBIOS. However, this is an advanced procedure and should generally be considered only when other troubleshooting methods have failed. The VBIOS contains firmware the graphics card uses to initialize and control various aspects of the GPU. A corrupted or incorrectly modified VBIOS can cause serious graphics card problems.
Before flashing a VBIOS, you need the correct original VBIOS for your exact graphics card model, which you can get from the manufacturer’s website or a trusted VBIOS database. The VBIOS must match the graphics card and its hardware configuration. You can use GPU-Z to find your current VBIOS/Graphics BIOS version. GPU-Z also lets you save your current GPU BIOS as a backup in case anything goes wrong during flashing.
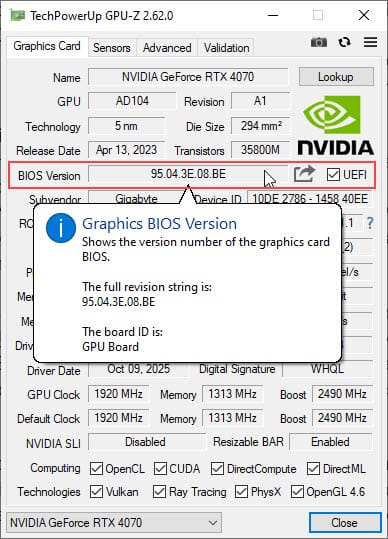
VBIOS flashing also requires specialized tools. NVIDIA graphics cards can use tools such as NVIDIA NVFlash, while AMD graphics cards may use AMDVBFlash/ATIFlash. An incorrect VBIOS or an interrupted flashing process can potentially render the graphics card unusable or brick it. Therefore, don’t treat this as a routine graphics card reset method. If the graphics card is working normally, there is generally no reason to flash its VBIOS. This method is optional and intended only for experienced PC users who understand the risks and have a specific reason to restore or replace the graphics card firmware.
Hardware Reset
A hardware reset involves physically removing and reinstalling the graphics card. Unlike software-based methods, hardware resetting checks the physical connection between the graphics card and the motherboard. A graphics card that is not properly seated in the PCIe x16 slot can cause no display, intermittent display output, crashes, or other problems. Dust, debris, physical movement, improper installation, or a loose connection can sometimes prevent the GPU from making proper contact with the PCIe slot. The most common hardware reset method is to reseat the graphics card.
Reseat the Graphics Card
Reseating the graphics card means physically removing the GPU from the PCIe x16 slot and reinstalling it. Although the procedure is relatively simple, it should be performed carefully.
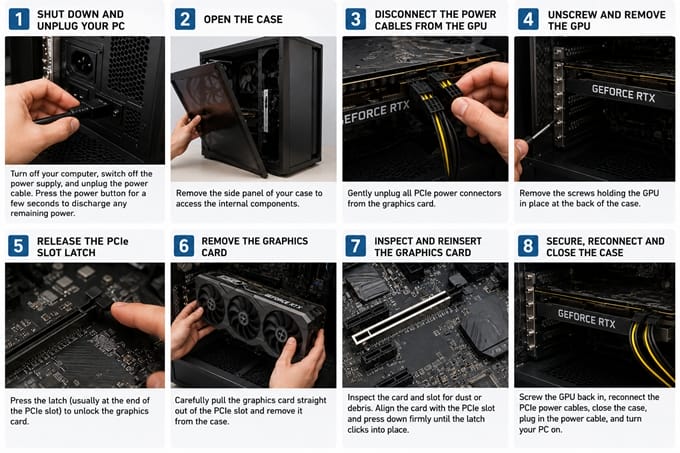
How to Reseat the Graphics Card
Below are the steps on how to reseat the graphics card.
1. Shut Down and Unplug Your PC
Turn off your computer, switch off the power supply, and unplug the power cable. Press the power button for a few seconds to discharge any remaining power.
2. Open the Case
Remove the side panel of your PC Case to access the internal components.
3. Disconnect the Power Cables from the GPU
Gently unplug all PCIe power connectors from the graphics card.
4. Unscrew and Remove the GPU
Remove the screws holding the GPU in place at the back of the case.
5. Release the PCIe Slot Latch
Press the latch (usually at the end of the PCIe slot) to unlock the graphics card.
6. Remove the Graphics Card
Carefully pull the graphics card straight out of the PCIe slot and remove it from the case.
7. Inspect and Reinsert the Graphics Card
Inspect the card and slot for dust or debris. Align the card with the PCIe slot and press down firmly until the latch clicks into place.
8. Secure, Reconnect, and Close the Case
Screw the GPU back in, reconnect the PCIe power cables, close the case, plug in the power cable, and turn ON your PC.
Turn on the computer and check whether Windows detects the graphics card and whether the display output works normally. If the display returns to normal after reseating the GPU, the problem may have been caused by an improper connection between the graphics card and the PCIe slot.
For a more detailed step-by-step guide, including visuals, see our guide on How to Reseat Graphics Card.
Which Graphics Card Reset Method Should You Use?
The correct reset method depends on the problem you are experiencing.
- If the screen has suddenly gone black while the computer is still running, try Win + Ctrl + Shift + B This is a quick way to reset the Windows graphics subsystem and may recover the display.
- If Windows is detecting the graphics card incorrectly, you can use Device Manager to disable and re-enable the GPU or scan for hardware changes.
- If you have manually overclocked the graphics card, restore the GPU and memory clocks to their default values using your graphics card tuning software.
- If you are experiencing driver crashes, blue screens, flickering, poor performance, or other problems that started after a driver update, consider performing a clean graphics driver installation.
- If the problems started immediately after installing a new driver, rolling back to an earlier stable driver may be more appropriate.
- If the graphics card has been modified at the firmware level and you have a specific VBIOS-related problem, an experienced user may consider VBIOS restoration or reflashing. This should be treated as an advanced procedure.
- Finally, if you suspect a physical connection problem, reseat the graphics card in the PCIe x16 slot.
What If Resetting the Graphics Card Does Not Fix the Problem?
Resetting the graphics card cannot fix every GPU-related problem. If the issue continues after resetting the graphics subsystem, restoring default clock speeds, reinstalling the driver, or reseating the GPU, the underlying cause may be elsewhere.
For example, display problems can also be caused by a defective HDMI or DisplayPort cable, a faulty monitor, an inadequate or failing power supply, overheating, motherboard problems, unstable system memory, or a defective graphics card.
If a graphics card repeatedly crashes at default settings even after a clean driver installation, it may require further hardware-level troubleshooting. You should also check GPU temperatures and make sure the graphics card’s fans and cooling system are working correctly. Excessive GPU temperatures can result in crashes, throttling, artifacts, and system instability.
Power delivery should also be considered. A graphics card requires sufficient and stable power from the power supply. Loose PCIe power connectors or an inadequate PSU can cause instability that will not be fixed by resetting the GPU. If the GPU produces graphical artifacts even after returning everything to default settings, this may indicate a hardware problem rather than a driver or configuration issue.
See also:
- Is Your GPU Underperforming [Top Causes with Solutions]
- Graphics Card Stopped Working Suddenly [Causes and Solutions]
- Graphics Card Stopped Working Suddenly [Causes and Solutions]
Final Words
Resetting a graphics card may fix many common display issues, but it’s not guaranteed to fix everything; some problems come down to a failing card or a power delivery issue that no reset will solve. Try the software methods first since they carry zero risk, and only reseat the card if you suspect a physical connection issue or the software fixes haven’t worked.
If you’ve tried every method in this guide and still see the same black screens, crashes, or artifacts, test the card in another system or have a professional check it to rule out a genuine hardware failure. If you have questions or are still facing graphics card-related issues, let me know in the comments below.
(*This post may contain affiliate links, which means I may receive a small commission if you choose to purchase through the links I provide (at no extra cost to you). Thank you for supporting the work I put into this site!)
![Fix Computer won’t Shut down in Windows [PC or Laptop]](https://graphicscardhub.com/wp-content/uploads/2022/06/computer-wont-shut-down-211x150.jpg "Fix Computer won’t Shut down in Windows [PC or Laptop]")
![How to Check Motherboard GPU Compatibility [Complete Guide]](https://graphicscardhub.com/wp-content/uploads/2026/09/check-motherboard-gpu-compatibility-211x150.jpg "How to Check Motherboard GPU Compatibility [Complete Guide]")