
Reseating a graphics card is an important troubleshooting step when you experience graphics card or display-related problems. Reseating means completely removing the graphics card from the motherboard’s PCIe x16 slot, then reinstalling it properly. A graphics card can sometimes develop a poor connection with the PCIe x16 slot because of dust, debris, slight misalignment, or a sudden shock or movement of the PC case. In such situations, removing and reinstalling the GPU can restore a proper connection and may fix the problem. Although reseating a graphics card sounds simple, there is a proper way to do it. You need to take certain precautions when removing and reinstalling the card because improper handling can damage the graphics card, PCIe x16 slot, connector, or other components. In this guide, I will show you how to reseat your graphics card safely and what you should check before reinstalling it.
Why Reseat Your Graphics Card?
A graphics card communicates with the motherboard through the PCIe x16 slot. The PCIe x16 connector on the graphics card must make proper contact with the contacts inside the motherboard slot for the GPU to work correctly. If the graphics card is not seated properly, you may experience different types of graphics card problems. In some cases, the PC may fail to detect the graphics card altogether, while in others, the GPU may work but exhibit unusual behavior. Some common problems that may indicate that your graphics card needs to be reseated include:
- Black screen or no video signal at all
- GPU running at a lower PCIe interface, e.g., PCIe x8 or x4, instead of the full PCIe x16
- Frequent freezing during gaming or regular use
- Random BSOD (Blue Screen of Death)
- GPU driver crashing randomly or frequently
- Artifacts appearing on the screen
- Screen flickering
If one of these problems started after moving, transporting, or accidentally hitting the PC case, checking and reseating the graphics card is a useful troubleshooting step. However, reseating the GPU does not guarantee that it will solve the problem. Graphics card problems can have many other causes, including faulty hardware, drivers, power delivery, or other components.
Why Is Graphics Card Reseating Needed?
A graphics card may be firmly seated in the PCIe x16 slot, but external factors can still disrupt the connection. A sudden shock or jerk to the PC case can cause slight movement or misalignment of the graphics card. This is especially true with heavy, long graphics cards because their weight can put extra stress on the PCIe slot and the card itself.
Dust is another possible reason for reseating the graphics card. Excessive dust around the PCIe x16 connector or inside the PCIe slot can interfere with proper contact. Similarly, sticker glue, dirt, or another foreign object stuck on the connector or slot can prevent the contacts from connecting properly.
Removing the graphics card allows you to inspect the PCIe x16 connector and slot. You can also clean them, if necessary, before reinstalling the card. If your graphics card shows display problems or the PCIe link isn’t operating as expected, reseating the card is worth trying before moving on to more complicated troubleshooting steps.
How to Reseat Graphics Card [Step-by-Step Process]
Below is the step-by-step procedure for properly reseating a graphics card.
1. Shut Down and Unplug Your PC
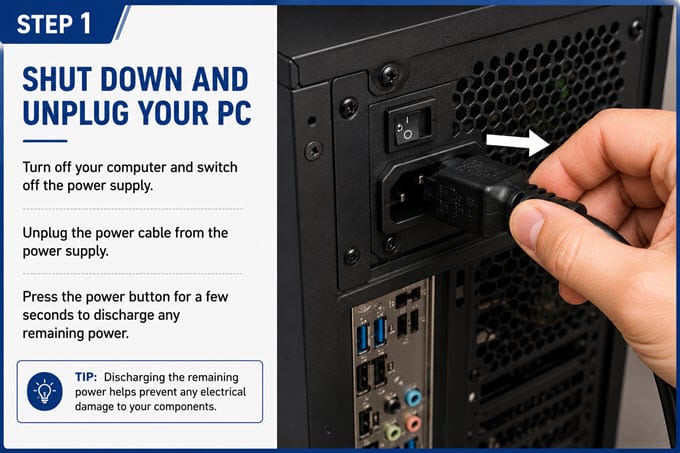
Before touching the graphics card or any internal component, shut down the computer completely. After the PC has shut down, switch off the power supply using the PSU power switch and unplug the power cable from the power supply. Press the PC’s power button for a few seconds to discharge any remaining power. Do not attempt to remove the graphics card while the PC is powered on or connected to the power source. It is also a good idea to place the PC somewhere where you can work comfortably and have clear access to the internal components.
2. Open the Case
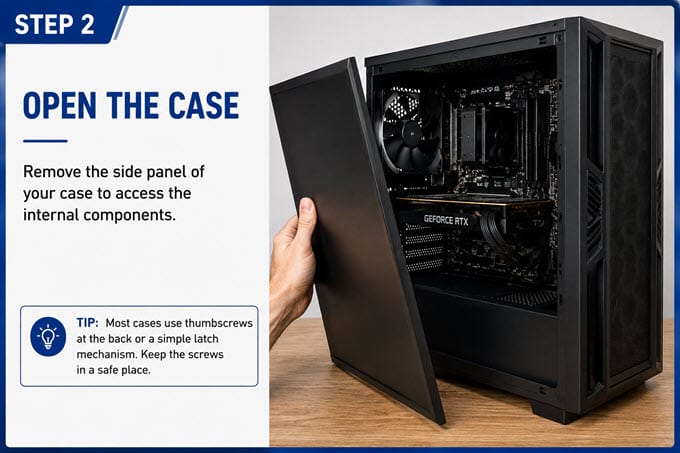
Remove the side panel of your PC case to access the graphics card and motherboard. Depending on your PC case, you may need to remove screws or release a tool-less mechanism before removing the side panel. Once the panel is removed, locate the graphics card and identify its PCIe power cables, mounting screws, and the PCIe x16 slot where it is installed. Before proceeding, make sure you can comfortably support the graphics card while removing it. This is especially important for large and heavy modern GPUs.
3. Disconnect the Power Cables from the GPU
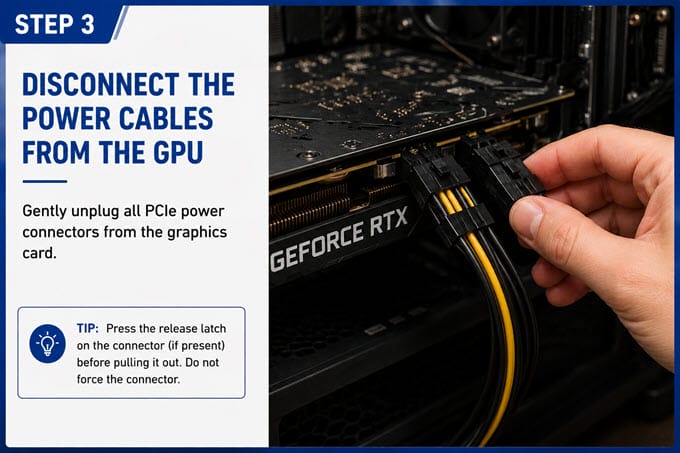
Gently unplug all PCIe power connectors from the graphics card. The exact number of power connectors depends on the graphics card. Some GPUs use one connector, while others require multiple PCIe power connectors. Carefully release the connector before pulling it out. Do not pull forcefully on the cable itself. If the connector is difficult to remove, make sure you release its locking mechanism before attempting to disconnect it. Avoid bending or twisting the graphics card while disconnecting the cables. Once you remove all GPU power connectors, keep the cables out of the way so they don’t interfere with removing the graphics card.
4. Unscrew and Remove the GPU
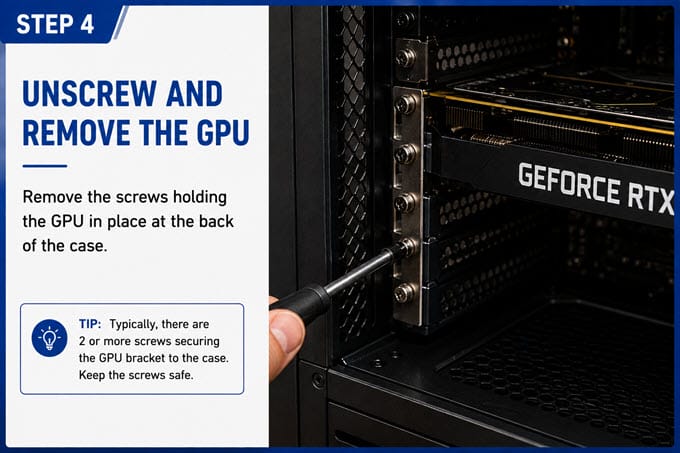
The graphics card is normally secured to the rear of the PC case with one or more screws. Remove the screws holding the graphics card in place. Keep the screws somewhere safe, as you will need them to reinstall the card. While removing the screws, support the graphics card with your other hand. This prevents the weight of the card from placing unnecessary stress on the PCIe slot. Do not allow a heavy graphics card to hang from the motherboard’s PCIe slot after removing the case screws.
5. Release the PCIe Slot Latch
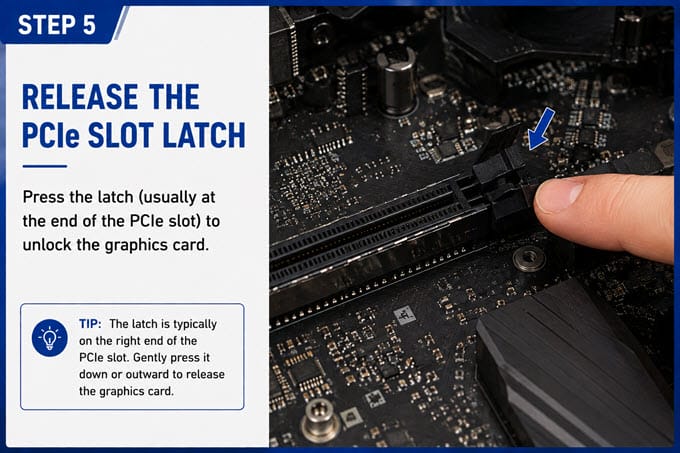
A PCIe slot latch secures the graphics card to the motherboard. The latch is usually located at the end of the PCIe x16 slot. Press the latch to unlock the graphics card. Be particularly careful during this step. PCIe slot locking mechanisms can differ between motherboards, and some manufacturers use their own mechanisms to make GPU removal easier. For example, ASUS uses PCIe Slot Q-Release on some motherboards, while Gigabyte offers mechanisms such as PCIe EZ-Latch Plus.
If you are not sure how your motherboard’s PCIe x16 slot locking mechanism works, consult the motherboard manual before attempting to release it. Do not force the graphics card out while the latch is still engaged. Trying to remove the GPU without properly releasing the lock can damage the graphics card PCIe connector or the motherboard PCIe slot.
6. Remove the Graphics Card
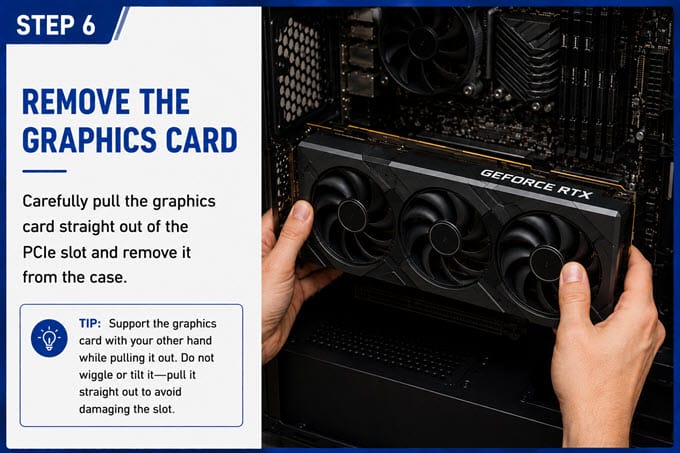
After releasing the PCIe slot latch, carefully pull the graphics card straight out of the PCIe x16 slot. Support the card while removing it, particularly if you are working with a large or heavy graphics card. Try to keep the card level as you remove it and avoid twisting, bending, or rocking it aggressively from side to side. Once you remove the graphics card, place it on a clean, safe surface. Avoid placing the PCIe connector directly on a dirty or rough surface. After removing the Graphics Card, inspect it and the PCIe slot before reinstalling it.
7. Inspect and Reinsert the Graphics Card
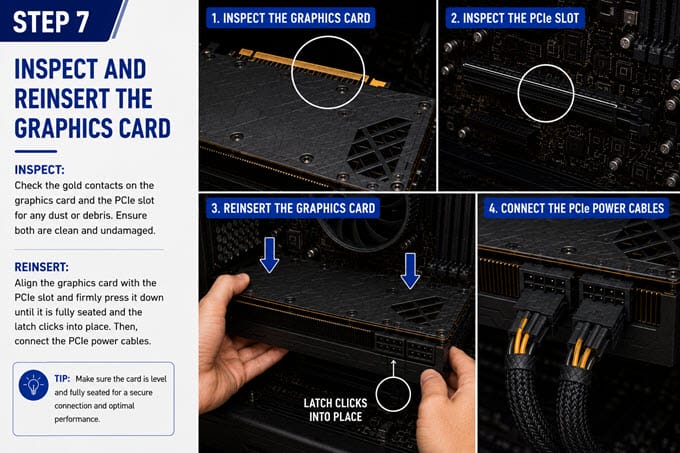
Inspection is important because simply removing and reinstalling the graphics card may not solve the problem if dust or physical damage is causing a poor connection. First, inspect the graphics card’s PCIe x16 connector for dust, debris, sticker glue, or anything else that could interfere with proper contact. Also inspect the motherboard’s PCIe x16 slot for dust and debris.
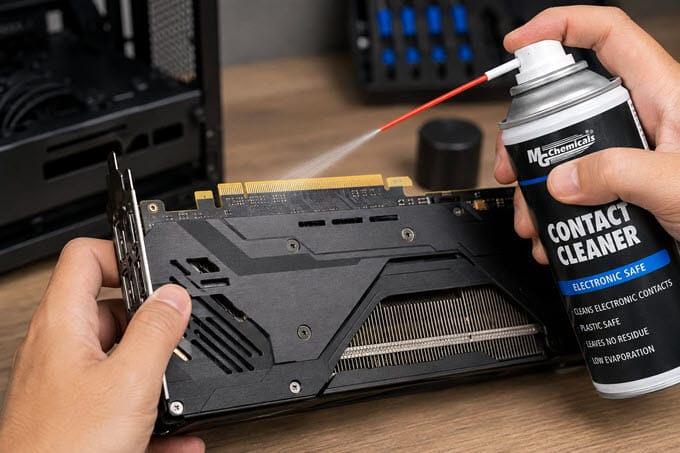
If necessary, clean the graphics card PCIe x16 connector using a suitable electronic contact cleaner spray, e.g., WD-40 Specialist Contact Cleaner Spray or 99.9% isopropyl alcohol. You can use an electric compressed air duster to clean dust from the PCIe x16 slot. Do not ignore the condition of the graphics card itself. Visually inspect the PCIe x16 connector and the PCB around it for any visible cracks or physical damage. If you notice a crack or other physical damage, do not simply reinstall the card and assume that reseating will fix the issue. Have a trusted graphics card repair expert check and repair the card.
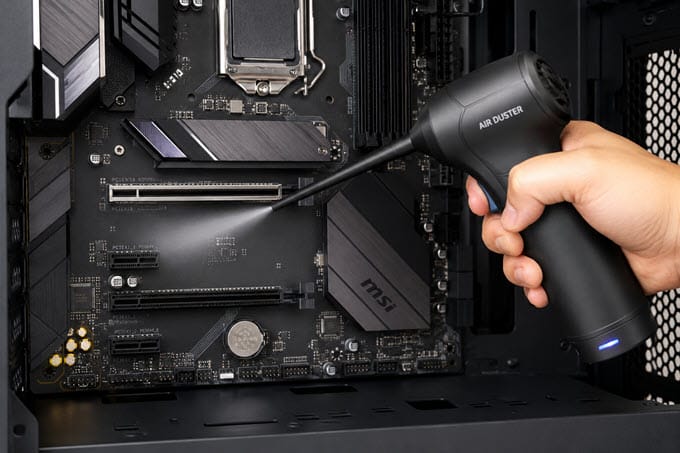
If you find no physical damage, you can proceed with reinstalling the GPU. Carefully align the graphics card with the motherboard’s PCIe x16 slot. Make sure the rear bracket of the graphics card is positioned correctly with the opening at the back of the case. Once everything is aligned, press the graphics card firmly and evenly into the PCIe x16 slot.
The card should be fully seated in the slot, and the PCIe latch should click into place. Do not use excessive force. If the card does not align properly, remove it and check the position before trying again. Make sure the graphics card is fully inserted before securing it to the case. Once the graphics card is properly seated, secure it to the PC Case using the screws that were removed earlier. Make sure the graphics card is held firmly in place and does not move around.
Next, reconnect all the PCIe power cables to the graphics card. Ensure that each connector is properly inserted. After reconnecting the GPU power cables, perform a quick visual check. Make sure no cables are interfering with the graphics card fans and that the graphics card is properly seated and secured.
8. Close the PC Case
You can now reinstall the side panel of the PC Case. Reconnect the PC power cable, switch on the PSU, and turn on the computer. Check whether the original problem has been resolved. If the PC boots normally and the graphics card is detected correctly, the reseating process was successful.
What to Check After Reseating the Graphics Card?
After starting the PC, check whether the original symptoms have disappeared. If you were experiencing a black screen or no video signal, check whether the display now works normally.
If the problem was related to the PCIe interface, check whether the graphics card is now operating at the expected PCIe link width. A graphics card running at PCIe x8 or x4 when it should be operating at x16 may indicate a connection or configuration issue. However, PCIe link behavior can also depend on the platform and workload.
Also check for other symptoms that made you reseat the card, such as freezing, BSODs, driver crashes, artifacts, or screen flickering. If the same problem continues after reseating and cleaning the connection, the cause may be something other than a loose or poor PCIe connection.
Important Tips Regarding Graphics Card Reseating
Below are important tips and advice related to graphics card reseating.
Use a GPU Brace or Support
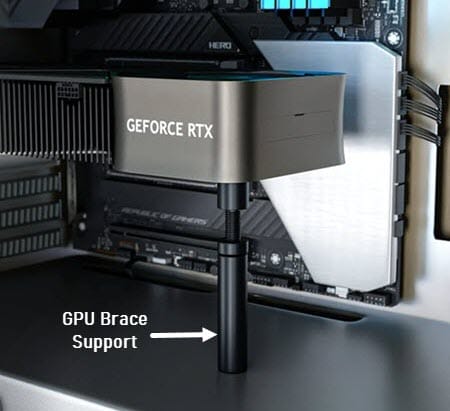
A GPU holder, brace support, or graphics card support bracket is recommended, especially for heavy and long graphics cards. A suitable support can help prevent excessive graphics card sagging and reduce stress on the card’s PCB, components, and PCIe x16 connector. This is particularly useful for large graphics cards because their weight can put additional strain on the PCIe slot over time.
Avoid Shocks and Jerks
Avoid sudden shocks and jerks to your PC case. Physical movement can potentially disrupt the graphics card connection or cause slight misalignment. You can secure your PC using an under-desk PC mount or wall mount to reduce the chances of the case being accidentally moved, knocked, or bumped. This is especially useful if your PC is placed in an area where it can easily be hit or moved.
Keep the PCIe Connection Clean
Dust and debris can interfere with proper contact between the graphics card PCIe x16 connector and the motherboard PCIe x16 slot. Whenever you remove the graphics card for troubleshooting, inspect the connector and slot for dust or other contaminants. Clean the graphics card PCIe x16 connector using an appropriate electronic contact cleaner or 99.9% isopropyl alcohol when necessary. Use an electric compressed air duster to clean dust from the PCIe x16 slot. Avoid putting unnecessary pressure on the PCIe slot or connector during cleaning. Also, keep your PC Case reasonably dust-free with regular cleaning, since dust buildup is one of the most common and preventable causes of a poor PCIe connection.
Be Careful with the PCIe Slot Latch
The PCIe slot latch is small and can be easy to overlook when removing a graphics card. Always release it properly before pulling out the GPU. If the graphics card does not come out easily, stop and check whether the latch is still engaged. Forcing the card out can damage the PCIe connector or motherboard slot.
What If Reseating Does Not Fix the Problem?
If the graphics card still shows the same problem after you remove it, inspect it, clean it, and reinstall it properly, the issue may not be a poor PCIe connection. Check the graphics card and PCIe slot again for visible physical damage. If you find cracks or other damage around the PCIe connector or PCB, have a trusted graphics card repair expert examine the card. If you see no damage, you may need further troubleshooting to identify the cause. Reseating should therefore be considered one troubleshooting step, not a guaranteed solution for every graphics card problem.
See also:
Final Words
Reseating your graphics card is a simple, five- to ten-minute fix that resolves a surprisingly large number of GPU-related issues, from black screens to random crashes. As long as you power down properly, ground yourself, handle the card gently, and follow your motherboard’s specific slot-release mechanism, there is no risk involved. It costs nothing and often solves problems that would otherwise send people straight to reinstalling Windows, replacing a power supply, or sending a perfectly good card in for RMA.
If reseating doesn’t resolve the issue, the problem likely lies elsewhere, such as the drivers, the power supply, a loose power connector, or a genuine fault on the card itself. In that case, work through those areas one at a time, starting with the simplest and cheapest checks, such as reseating the power cables and updating the GPU driver, before moving on to more involved troubleshooting or a professional repair.
(*This post may contain affiliate links, which means I may receive a small commission if you choose to purchase through the links I provide (at no extra cost to you). Thank you for supporting the work I put into this site!)
![How to Buy Graphics Card during Cryptocurrency Mining Boom [For Gamers]](https://graphicscardhub.com/wp-content/uploads/2018/01/buy-graphics-card-gamers-mining-boom-211x150.jpg "How to Buy Graphics Card during Cryptocurrency Mining Boom [For Gamers]")
